
The J-Integra® for .NET Eclipse Plug-in provides seamless integration of J-Integra® for .NET functionality with the Eclipse Platform Integrated Development Environment. (Visit http://www.eclipse.org/eclipse for information about the Eclipse Project). It enables developers who use Eclipse to incorporate J-Integra® for .NET into their Java server or client applications while working entirely within the environment of their Eclipse IDE workbench tool.
The J-Integra® for .NET Eclipse Plug-in was built using the Eclipse PDE (Plug-in Development Environment). It extends the functionality of the Eclipse IDE to include the tasks of:
It provides Eclipse users with a more integrated alternative to running the standalone J-Integra® for .NET applications Janetor and GenJava. The J-Integra for .NET Eclipse Plug-in provides Java-side functionality to complement the .NET-side functionality provided by the Visual Studio .NET Plug-in.
Note that you may still want to use the command line versions of the Janetor and GenJava applications, for example, to incorporate them into an automated build process.
Two versions (2.1 and 3.0) of the J-Integra® for .NET Eclipse Plug-in are available, for use with either version 2.1 or 3.0 of the Eclipse Platform respectively. The 2.1 version of the plug-in is fully compatible with IBM's WebSphereŽ Studio Application Developer v5.1.2 (which is based on Eclipse 2.1).
Both versions of the J-Integra® for .NET plug-in only have dependencies on core Eclipse Platform components. They do not require the installation of any other Eclipse plug-in features. Specifically, the J-Integra for .NET plug-in has dependencies on the following components of the Eclipse Platform plug-in framework:
Besides the core Eclipse Platform, it is envisaged that Java developers will typically also be using the Eclipse JDT (Java Development Tools), although this is not a pre-requisite.
The plug-in should be used with version 2.1 (or higher) of the J-Integra for .NET product which can be downloaded from the (J-Integra Website). The plug-in has dependencies on the J-Integra® for .NET libraries janet.jar and genjava.jar. 2.1 (or higher) versions of these libraries are also included with the plug-in, under the lib directory.
The J-Integra for .NET Plug-in download comprises a ZIP file. Use the file named JI_eclipse21.zip with Eclipse version 2.1 (including IBM's WebSphereŽ Studio Application Developer v5.1.2), or use the file named JI_eclipse30.zip if you are using Eclipse version 3.0. To install the J-Integra® for .NET Plug-in, extract the contents of this ZIP file to your eclipse\plugins directory and restart Eclipse. These files can be found in the following location $USER_INSTALL_DIR$\plugins\eclipse.
Note that if you are using WebSphereŽ Studio Application Developer, the J-Integra for .NET menu item and toolbar button may not be displayed by default in all perspectives, such as the J2EE perspective. To display them, use the Window->Customize Perspective menu option and check the J-Integra .NET box under the Other branch.
To uninstall the plug-in, delete the com.intrinsyc.janet.eclipse_x.x.x folder under eclipse\plugins (where x.x.x is the version number) and restart Eclipse.
When you re-start Eclipse after installing the J-Integra® for .NET Plug-in, you will notice an additional menu entitled J-Integra .NET with a single menu item Configure... and also a toolbar button with the J-Integra icon.

Selecting either the J-Integra.NET->Configure...
menu item or the J-Integra toolbar button  invokes a wizard
to create a J-Integra® for .NET configuration file (usually named "janet.xml").

The wizard prompts you to select the workspace project or folder in which you wish to create the configuration file, and also the name of the configuration file. By default the file will be named janet.xml. You can alternatively name it janet_tcp.xml or janet_http.xml, if you want to distinguish between different versions used for TCP and HTTP channels. If there are no projects or folders in your workspace, you will need to create a new project / folder or import an existing project / folder using the standard Eclipse workbench File menu.
Clicking on the Finish button causes the configuration file to be created and populated with an initial set of default values. The editor is also opened, allowing you to edit these values according to your application / deployment needs. If there is already an existing configuration file of that name in the selected project / folder, then it will be opened for editing.
TIP: You can also invoke the editor to view/edit an existing configuration file (if it is named "janet.xml", "janet_tcp.xml" or "janet_http.xml") by just double clicking on the file.
The J-Integra® for .NET editor (used for editing "janet.xml" configuration files), is very similar to the Eclipse Plug-in Development editor that is used for editing "plugin.xml" files. It is a multi-page editor, comprising a number of pages that allow the configuration settings to be viewed and modified, and additionally a page which displays the generated XML text (the actual contents of the "janet.xml" file). The raw XML text page is currently for viewing purposes only. It cannot be edited directly - only via the other pages.
The editor opens at the General page.

This allows the usage (for Java servers and/or clients) to be selected and general runtime settings to be specified. The General, Licensing, Logging and XML text pages are always displayed, regardless of the client/server usage selection. The other pages are specific to the server/client usage and are only activated based on the usage selection. The Exceptions, Web/TCP Server and Local Objects pages are specific to server usage, and the Remote Objects page is specific to client usage.
The content and layout of each of the editor pages is very similar to that of the standalone Janetor application. You can also refer to the Janetor Configuration Tool documentation for more detailed information about specific configuration parameters.
When the editor is opened, an additional Generate menu appears which has two menu items with corresponding toolbar buttons:

The "Generate Java Proxies..."
menu item and toolbar button ![]() are only
enabled if Java Clients usage
has been selected. The "Export Web Application
Archive (WAR)..." menu item and toolbar button
are only
enabled if Java Clients usage
has been selected. The "Export Web Application
Archive (WAR)..." menu item and toolbar button ![]() are only enabled if Java
Servers usage is selected.
are only enabled if Java
Servers usage is selected.
When edits are made to configuration parameters, an asterisk (*) will appear next the editor page title to indicate that there are unsaved changed. Use the standard Eclipse workbench File->Save menu item or Ctrl+S shortcut to save changes to the configuration file. If you close the editor without saving changes, you will be prompted to confirm whether you wish to save changes to the file, or discard them and leave it unchanged.
The General page comprises a Usage section and a Runtime section. Check the Java Servers box if your application / deployment configuration comprises Java servers that you wish .NET clients to be able to access. Check the Java Clients box if your application comprises Java clients that access .NET servers.
The Usage selection causes the activation / deactivation of editor pages that are specific to client or server usage. Selecting Java Servers activates the Exceptions mappings, TCP / Web Servers, and Local Objects pages, and also enables the Export Web Application Archive (WAR)... menu item and toolbar button. In addition it creates a default local object, if one doesn't already exist. Selecting Java Clients activates the Remote Objects page, and also enables the Generate Java Proxies... menu item and toolbar button. It causes a default remote object to be created, if one doesn't already exist.
If you are opening an existing configuration file, the Java Servers usage setting will be automatically selected if there is at least one local object besides the default one, or the default one has non-empty settings. The Java Clients usage setting will be automatically selected if there is at least one remote object besides the default one, or the default one has non-empty settings.
If the configuration contains local objects other than an empty default one, then un-checking Java Servers will pop up a confirmation dialog asking you whether you would like these objects to be deleted.

Selecting Yes will cause all the local objects to be removed from the configuration and the default object settings to be re-initialized. Selecting No will leave the local object settings unchanged.
Similarly, if you have defined Remote Objects, then un-checking the Java Clients check box will pop up a confirmation dialog asking you whether you would like these objects to be deleted and the default remote object reset to it's initial state.
The Runtime section allows you to specify general settings that affect the J-Integra® for .NET runtime, such as the version of the .NET Framework that you are using, and whether you wish to map collection/dictionary types. The Lease Manager settings are only enabled in the case of Java Servers usage. See also The Janetor Configuration Tool documentation for more information about the runtime configuration settings.
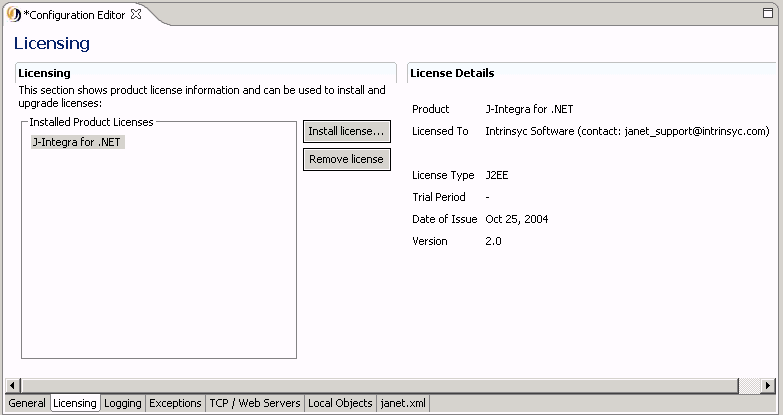
The licensing section enables you to install and remove J-Integra for .NET licenses. You must install a J-Integra® for .NET license in order to use the J-Integra® for .NET runtime.
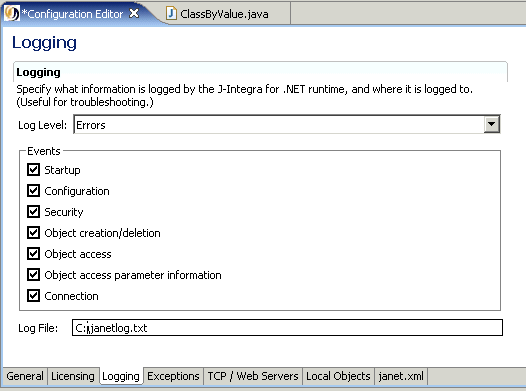
Logging may be optionally enabled, causing the J-Integra® for .NET runtime to log information to a file. This can be useful for troubleshooting. The Logging page enables you to specify the logging file to be used and the filter to be applied (for log level and event types).
See also The Janetor Configuration Tool documentation for more information about the logging configuration settings.
Selecting Java Servers usage activates the Exceptions, TCP / Web Servers and Local Objects pages.
The Exceptions page allows you to specify Java exceptions that you wish to map to .NET. These are Java exceptions for which you want J-Integra® for .NET to throw a specific exception type to .NET. You can specify your own custom exceptions, or Java language exceptions. If the exception is not specified here, J-Integra® for .NET will throw a generic RemotingException. The Java exception can be added by using the Add ... button and entering the fully qualified class name. Note that this exception must have a corresponding .NET proxy class, which you can generate using the Visual Studio .NET Plug-in or the GenNet Tool.

The TCP / Web Servers page allows you to specify configuration settings for J-Integra® for .NET's TCP server or internal Web Server.

TCP server configuration is only applicable if you are using the TCP channel. The Web Server configuration is only applicable if you are using the HTTP channel and choose to use the internal Web Server that is included with J-Integra® for .NET. See also the TCP Server and Web Server sections of the Janetor Configuration Tool documentation for more information about the server configuration settings.
Alternatively, if you wish to deploy your server objects using an external
Web Server or Application Server, you can use the "Export
Web Application Archive (WAR)..." menu item or toolbar button
![]() to create a WAR file.
to create a WAR file.
The Local Objects page is used to specify the settings of the Java server objects that you wish to access from .NET using J-Integra for .NET. These Java objects are "local" to the J-Integra for .NET JVM. The configuration settings include those for Activation, Lease Management (for Client Activation Mode) and EJB Context information.

To add a specific Java server class, select the Add Class... button. A dialog pops up and prompts you to specify the class. Include the full package and class name. At run-time, the JVM must be able to find and load this class (i.e. it must be in the CLASSPATH).
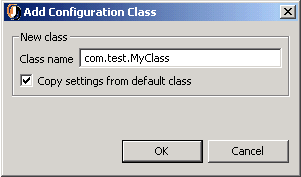
Check the Copy settings from default class box if you would like the new class to be initialized with the same settings as those defined for the default local object class.
To remove a class, select the class from the list and then select the Remove class button. Remember to save your settings to file.
See also The Janetor Configuration Tool documentation for more information about the local objects configuration settings.
Selecting Java Clients usage activates the Remote Objects page.
The Remote Objects page is used to specify the settings of the .NET server objects that you wish to access from Java clients via .NET Remoting using J-Integra® for .NET. These .NET objects are "remote" to the J-Integra® for .NET JVM. The configuration settings include those for Activation and Authentication.
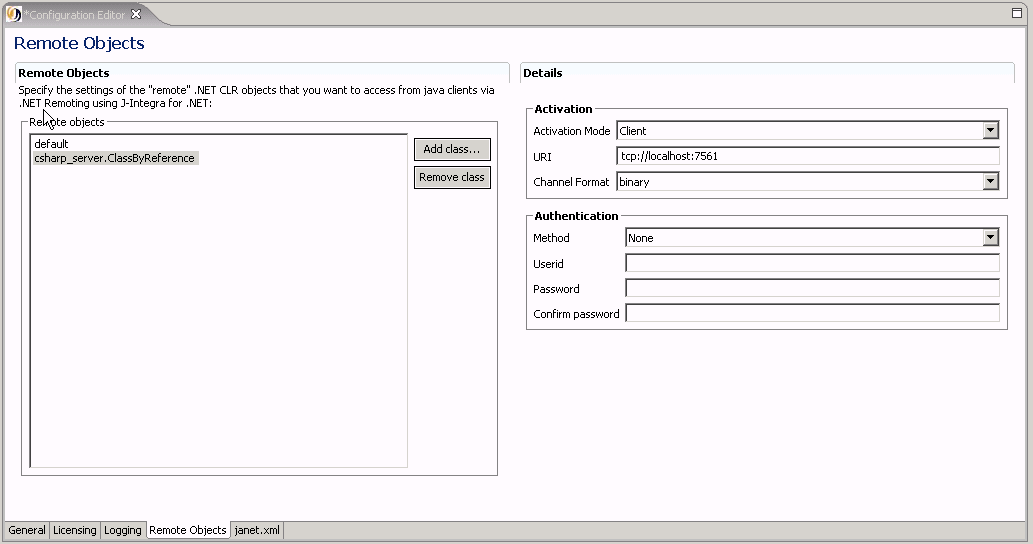
To add a specific .NET server class, select the Add Class... button. A dialog pops up and prompts you to specify the class. Include the full namespace and class name.

Check the Copy settings from default class box if you would like the new class to be initialized with the same settings as those defined for the default remote object class.
To remove a class, select the class from the list and then select the Remove class button. Remember to save your settings to file.
See also The Janetor Configuration Tool documentation for more information about the remote objects configuration settings.
Selecting Java Servers usage
enables the Export Web Application Archive
(WAR)... menu option and toolbar button ![]() . If
you wish to deploy your server classes with J-Integra for
.NET in an Application Server or Web Server (other than the J-Integra
for .NET internal web server), then select this menu item or toolbar button to
create a .war file . A dialog is invoked enabling you to specify
the Web Application Archive parameters,
which include the application display name, the J-Integra .NET and user
library to be deployed, the output .war file path and the EJB
References.
. If
you wish to deploy your server classes with J-Integra for
.NET in an Application Server or Web Server (other than the J-Integra
for .NET internal web server), then select this menu item or toolbar button to
create a .war file . A dialog is invoked enabling you to specify
the Web Application Archive parameters,
which include the application display name, the J-Integra .NET and user
library to be deployed, the output .war file path and the EJB
References.
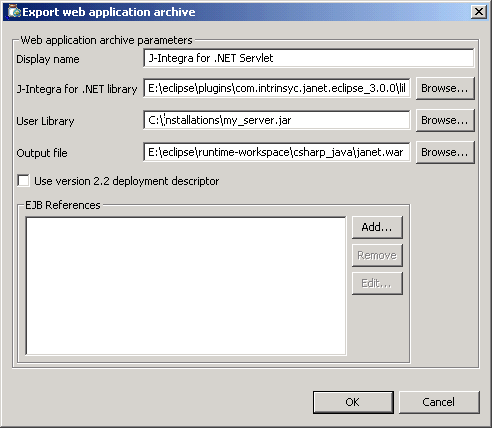
The J-Integra® for .NET configuration file ("janet.xml") is also included in the Web Application Archive. If there are any outstanding changes, they will be automatically saved to the janet.xml file before it is added to the .war file.
See also The Janetor Configuration Tool documentation for more information about the Web Application Archive configuration settings..
Selecting Java Clients usage
enables the Generate Java Proxies...
menu item and toolbar button ![]() . Select either of
these to have J-Integra auto-generate Java proxy classes for the .NET
server objects that you wish to access. A wizard is invoked that guides
you through the proxy generation process. The J-Integra® for .NET service
"GenService" is used
to analyze the .NET assemblies. This service should be installed on the
Windows host machine on which the .NET assemblies reside (or it can be
local if they are accessible via a shared network drive). The wizard prompts
you to select the GenService instance that you wish to use. A multicast
mechanism is used to detect the instances of GenService that are running on
the network. It also specifically checks to see if an instance of GenService
is running on the local host. If it is unable to automatically detect
the GenService that you wish to use (for example, because it is on
a remote host and IP multicast is disabled), you can select Enter Host Manually and click the Next button to specify the host name
or IP address of the GenService host.
. Select either of
these to have J-Integra auto-generate Java proxy classes for the .NET
server objects that you wish to access. A wizard is invoked that guides
you through the proxy generation process. The J-Integra® for .NET service
"GenService" is used
to analyze the .NET assemblies. This service should be installed on the
Windows host machine on which the .NET assemblies reside (or it can be
local if they are accessible via a shared network drive). The wizard prompts
you to select the GenService instance that you wish to use. A multicast
mechanism is used to detect the instances of GenService that are running on
the network. It also specifically checks to see if an instance of GenService
is running on the local host. If it is unable to automatically detect
the GenService that you wish to use (for example, because it is on
a remote host and IP multicast is disabled), you can select Enter Host Manually and click the Next button to specify the host name
or IP address of the GenService host.

The next wizard page prompts you to specify the .NET Assembly containing the .NET server objects that you wish to access.
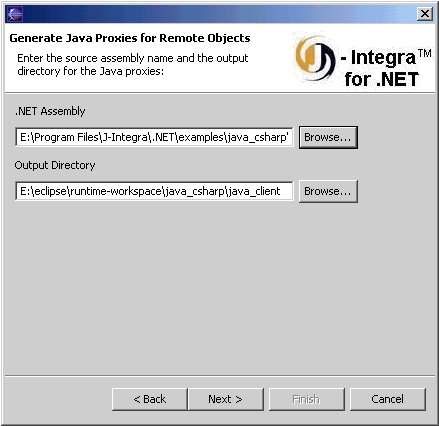
Enter the full path of the .NET Assembly on the GenService host, or (if it is on the local host) you can use the Browse button. Note that the default file extension filter for the file selection dialog is .exe . Select the .dll or *.* filter options to see .DLL Assemblies.
This wizard dialog page also prompts you to specify the output directory for the generated Java proxy classes. By default the current project folder is selected.
Clicking the Next button initiates proxy generation. The status of the proxy generation process is displayed in a status page:
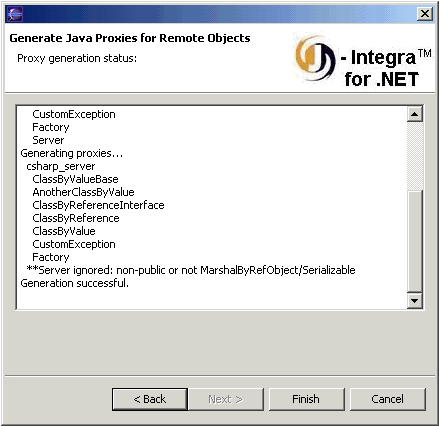
The assembly classes being analyzed and the generated Java proxy classes are listed as they are processed. When the generate process has completed successfully a "Generation successful." message is displayed and the Finish button is enabled. Clicking the Finish button causes the proxy generation settings (for the GenService URI, assembly path and output directory to be saved in a file named "genjava.xml" in the same directory as the "janet.xml" configuration file. The values in the "genjava.xml" will then be used to initialize the wizard's dialogs if you re-run the proxy generation wizard.
Notice the warning message displayed in the screen shot:
**Server ignored: non-public or not MarshalByRefObject/Serializable
GenService will display this message for every .NET class that it encounters that does not inherit from MarshalByRefObject (mandatory for marshal by reference objects as dictated by .NET Remoting) or have the Serializable attribute (mandatory for marshal by value objects). Such classes will be ignored and no Java proxy generated for them.
The generated Java proxy classes are created in sub-directories of the specified output directory whose names correspond to the .NET assembly namespaces. To build the Java proxy classes you will need to add the J-Integra for .NET runtime library "janet.jar" to your project's Java build path as an external JAR
Besides the Java proxy classes, the proxy generator also auto-generates two .NET remoting configuration files: "remoting_tcp.config" (for TCP channel use) and "web.config" (for Web Server use). These files are placed in the selected output directory. You will need to edit them (if necessary) and copy them to the location of your .NET server for deployment. The port number specified as part of the URI in the Remote Object configuration information is used in the channel specification of the auto-generated remoting_tcp.config file. Note that the remoting service specification in the auto-generated remoting_tcp.config file currently always defaults to client activation. You will need to modify this from "activation type = ... " to "wellknown type = ..." for Web Services activation mode.
We welcome your comments and suggestions about this product. Please send your feedback to janet_support@intrinsyc.com.
|
© 2007 Intrinsyc Software International, Inc. All rights reserved. Legal |