The J-Integra for .NET configuration settings are loaded and read from a configuration file at run-time. By default, this file is called janet.xml and loaded from the same directory where the J-Integra® for .NET runtime is launched.
The Janetor configuration tool is used to create and modify the configuration file. It is also used to install a valid J-Integra® for .NET license - see Installing the J-Integra® for .NET License for further instructions. This section describes the Janetor configuration tool and includes a detailed description of the J-Integra for .NET configuration parameters.
Use this section as a quick reference to start Janetor.
Launch Janetor from the Start Menu.
java -jar $USER_INSTALL_DIR$\lib\janetor.jar [arguments]
Possible arguments include:
| Argument | Description | Example |
-f | -file filename |
Read configuration from filename |
-f janet.xml |
-w | -war |
Generate WAR file from current configuration. |
-w |
-li | -license-install filename |
Install license filename. |
-li janet_license.xml |
The J-Integra® for .NET runtime (janet.jar) must also be in $USER_INSTALL_DIR$\lib. The main class that is called when launching Janetor is com.intrinsyc.janet.janetor.JanetorApp.
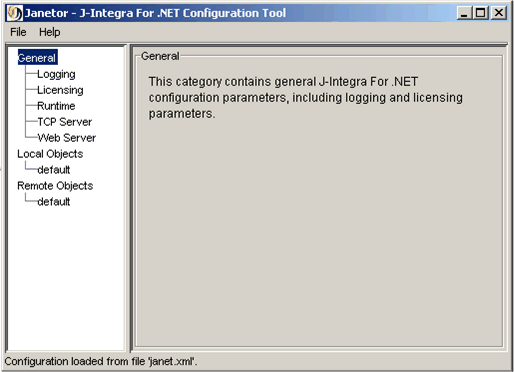
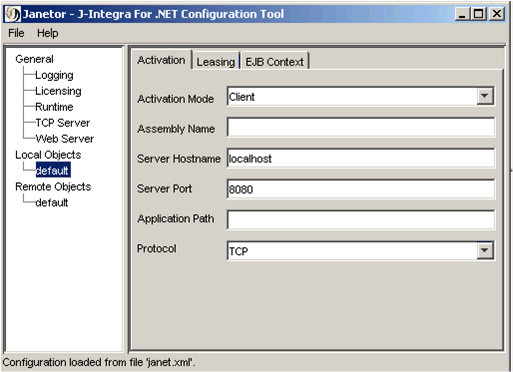
Upon starting Janetor, the user interface looks something like this:
Settings have been organized into categories which are displayed in the tree on the left. The three main categories are General, Local Objects and Remote Objects. Selecting a category in the tree updates the panel on the right with a detailed view of the settings within that category.
All of the settings shown on the panels on the right can be modified. The modified settings can be saved to a settings file, as described in the next section.
The following menu items are available in Janetor:
| Field | Description |
| File - Open |
Opens the file browser dialog to load a J-Integra® for .NET configuration file. |
| File - Save |
Saves the current configuration to janet.xml in the same directory where Janetor was launched. |
| File - Save As... |
Saves the current configuration to a specified filename and location. |
| File - Export web application archive... |
Launches another dialog to create a Web Application Archive (WAR file). See Create a Web Application Archive File for more details |
| File - Exit |
Exits the Janetor application. |
| Help - About |
Displays the version of J-Integra® for .NET that is currently installed. |
These settings apply to both local (Java) objects and remote (.NET) objects, hence the name of the category.
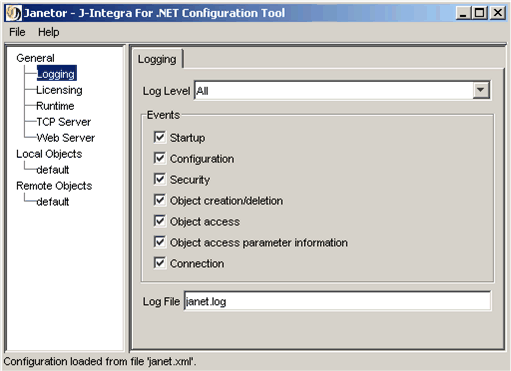
These settings determine what information is logged by the J-Integra for .NET runtime, and where it is logged to.
| Field | Description |
| Log Level |
Severity level to be logged. If None is chosen, logging is not started, no matter what other options are chosen. |
| Events |
Specifies which events will be logged. Each event type that is selected will be logged. |
| Log File |
Full path to the output log file. |
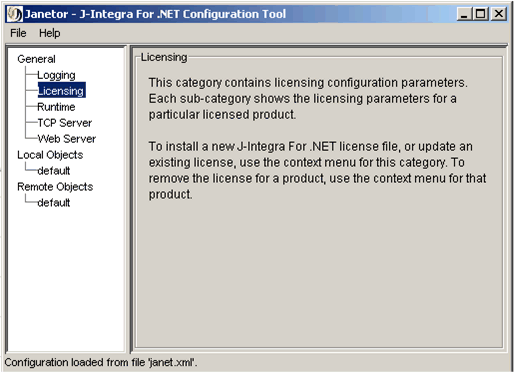
This setting contains a list of licensed J-Integra® for .NET products. To install a J-Integra® for .NET license, right-click on this node and select Install license.... The file browser dialog opens and prompts you to select a valid J-Integra® for .NET license file.
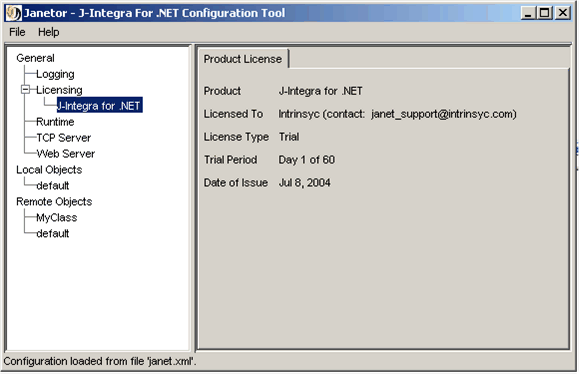
Once the license is installed, you should see a new node created the states the product name. Clicking on this node gives the details of the product license in the right panel:
These settings determine how the J-Integra® for .NET runtime operates and specifies the custom Java exception mappings.
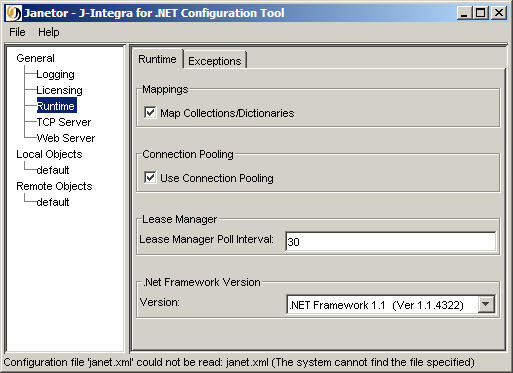
| Field | Description |
| Map Collections/Dictionaries |
If this option is checked, when generating .NET proxies, Genservice will generate currently available mappings when encountering types from the java.util package. For example, for java.util.Vector, it will generate System.Collections.ArrayList. However, this implies that such types passed as parameters will always be marshalled by value. If this option is not checked, then Genservice will generate the normal remote proxy type so that there is no mapping. This implies that such types passed as parameters will always be marshalled by reference. This must be used in conjunction with the Map Collections/Dictionaries option in GenNet. |
|
Connection Pooling |
Check this option to use TCP connection pooling. This is only valid for TCP channels. TCP connection pooling improves performance by pooling connections and only creating them when needed. |
| Lease Manager |
This is the interval at which the Lease Manager periodically checks all leases to see whether any have expired. This time is in seconds. Note: Specifying a shorter lease manager poll interval will cause objects with short leases to be garbage collected more rapidly after their lease expires. However, there is some trade-off, as the shorter the lease manager poll interval will cause the lease manager thread to run more often to examine all leases (with consequent increased CPU load). |
|
.NET Framework Version |
Select the version of the .NET framework that is present on the .NET platform. Note: If you are using .NET Framework 3.0, select ".NET Framework 2.0". |
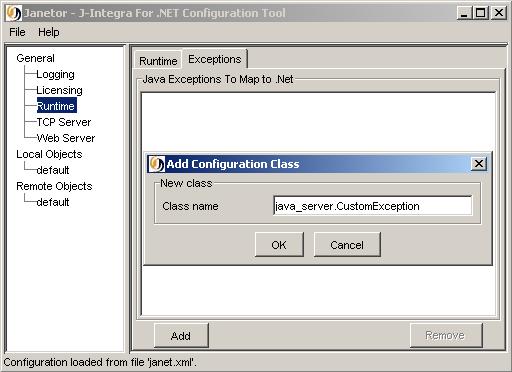
Java exceptions must be specified here for J-Integra® for .NET to properly throw the exception to .NET. If your exception is not specified here, J-Integra® for .NET will throw a generic RemotingException.
The Java exception can be added by using the "Add" button and entering the fully qualified class name. This exception must have a corresponding .NET proxy class. This .NET proxy can be generated by adding the exception class to GenNET. Please refer to Access Java from .NET Using J-Integra® for .NET for more information.
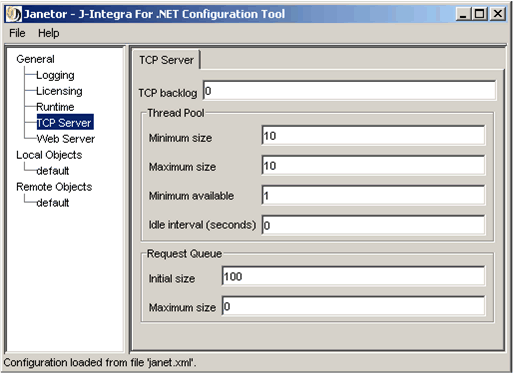
These settings determine how J-Integra® for .NET's TCP server is configured. A TCP server instance is created for each unique port number configured for local objects using the TCP/IP protocol (local objects with a URI starting with "tcp://"). The settings in this category determine the behavior of each TCP server instance.
The default settings in this category are suitable for most configurations and are normally only changed when performing load testing or tuning a production system. Additional information on the operation of the TCP server is available in the section The J-Integra for .NET TCP Server.
| Field | Description |
| TCP backlog |
TCP backlog (connection queue length) used by the server socket. Larger values may improve the system's ability to accept multiple simultaneous socket connection requests. If zero, the system default backlog is used. |
| Thread Pool - Minimum size |
Minimum number of threads in the thread pool. This is the number of threads started by the thread pool manager when a TCP server is started. The thread pool will never shrink below this size, regardless of thread use. |
| Thread Pool - Maximum size |
Maximum number of threads in the thread pool. The thread pool will not grow beyond this size, regardless of thread use. |
| Thread Pool - Minimum available |
Minimum number of available threads before additional threads are started. If the current number of threads in the thread pool is less than the Maximum size, the thread pool will attempt to add more threads ("grow" the thread pool) to keep up with incoming requests. Typically set to 1. |
| Thread Pool - Idle interval (seconds) |
The time, in seconds, to wait before shutting down surplus (unused) threads. Surplus threads are threads which are not being used and are not required to maintain the Minimum available or Minimum size requirements. When thread use drops below these configured thresholds, the thread pool manager will periodically shut down surplus threads ("shrink" the thread pool). This parameter determines the amount of time that the thread pool manager will wait before shutting down one surplus thread. If thread use is sporadic, and the idle interval is very short, the thread pool manager may waste resources by alternately growing and then shrinking the thread pool; for this reason, a minimum Idle interval of 15 seconds is recommended. If this parameter is set to zero, surplus threads are not shutdown. |
| Request Queue - Initial size |
Initial size of the request queue. The request queue is used to buffer accepted requests which have not yet been serviced. A larger initial request queue size may improve the server's ability to buffer large numbers of simultaneous connection requests, at the cost of additional memory use. |
| Request Queue - Maximum size |
Maximum size of the request queue. This parameter restricts the number of requests that can be buffered. Once the size of the request queue reaches this value, additional connection requests will be rejected. If zero, the queue grows as needed. |
These settings determine how J-Integra® for .NET's internal Web server is configured. The J-Integra® for .NET runtime also includes the Jetty Web server for HTTP requests. This is a (small scale) alternative to hosting J-Integra® for .NET in a full fledged J2EE-based Application Server. To see an example of this, go to Access Java from .NET Using J-Integra® for .NET's Web Server.
Click on the Use Internal Web Server option to enable the Web server:
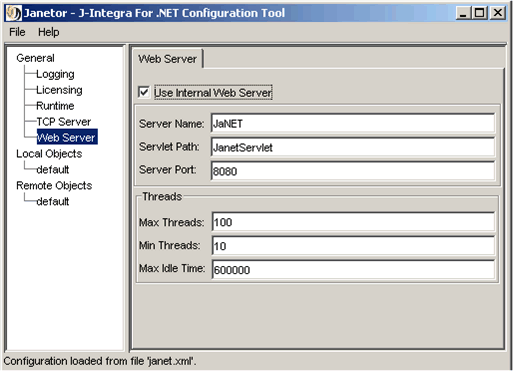
| Field | Description |
| Server Name |
The name of the server - either an IP address or machine name. |
| Servlet Path |
Endpoint to append to the URL. For example, if the endpoint is JanetServlet, then the URL would be constructed as follows: http://[Server Name]:[Server Port]/JanetServlet |
| Server Port |
Port which to start the internal Web server on. |
| Max Threads |
The maximum number of threads (i.e. simultaneous requests) that the internal Web server will process. The default is 100, which should be fine for most scenarios. |
| Min Threads |
The minimum number of threads to initially start with. |
| Max Idle Time |
Amount of idle time allowed (in ms) in before the server closes the client connection. |
The Local Objects category contains settings related to local objects. "Local objects" are Java objects residing inside J-Integra® for .NET's JVM.
Each node - other than default - contains settings for a particular Java class. The default settings are used for all classes not specified in the list of sub-categories. The Leasing tab also applies for a particular class (or default). The EJB Context tab, however, applies to all classes (explained below).
To add a specific Java class, right-click on Local Objects and select Add Class.... A dialog pops up and prompts you to add the specific class. Include the full package and class name. At run-time, the JVM must be able to find and load this class (i.e. it must be in the CLASSPATH).
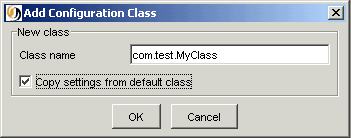
Check the Copy settings from default class box if you would like the new class to be initialized with the same settings as those defined for the default local object class.
To remove a class, right-click on the sub-category and select Remove class. Remember to save your settings to file.
This tab controls how local objects are activated.
| Field | Description |
| Activation Mode |
The activation mode to use for the local object. There are three to choose from, adhering to the .NET Remoting standard. The most conventional is Client, where J-Integra® for .NET will expose the local object as a standard object reference (similar to DCOM objects) with standard lifetime management. This is the J-Integra® for .NET equivalent to exposing the local object as a .NET Client Activated Object (CAO). The Server - singleton mode is the J-Integra® for .NET equivlanet to exposing the local object as a .NET Server Activated Object (SAO). Finally, the Web services option is the J-Integra® for .NET equivalent to exposing the local object as a .NET SingleCall SAO. |
| Assembly Name |
This is the name of the assembly containing the .NET proxies. The name must NOT include the DLL extension. |
| Server Hostname |
The machine name or IP address of the machine running the JVM. |
| Server Port |
The port to start the server on |
| Application Path |
Endpoint to append to the URL. For example, if the endpoint is JanetExample, then the URL would be constructed as follows: http://[Server Hostname]:[Server Port]/JanetExample The path can also be left blank, in which case there will be no endpoint appended to the URL. |
| Protocol |
The protocol to use. There are two to choose from, adhering to the .NET Remoting standard: either TCP or HTTP. When using HTTP, keep in mind that the internal Web server must be enabled, or J-Integra for .NET must be deployed as a WAR file. See Create a Web Application Archive File for more details. |
This tab displays settings to specify the lifetime of the local objects. This tab is only activated when the corresponding Activation Mode is set to Client. Leasing is not available for Server - singleton or Web services.
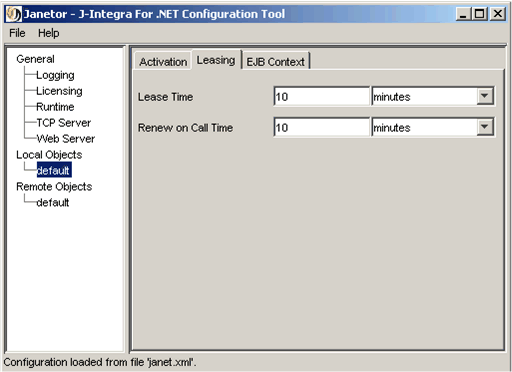
| Field | Description |
| Lease Time |
The length of time a local object is available for after activation. |
| Renew on Call Time |
The length of time to renew the lease on an object each time it is called. |
This tab displays settings to specify the properties used by the J-Integra for .NET Servlet to initialize the EJB environment:
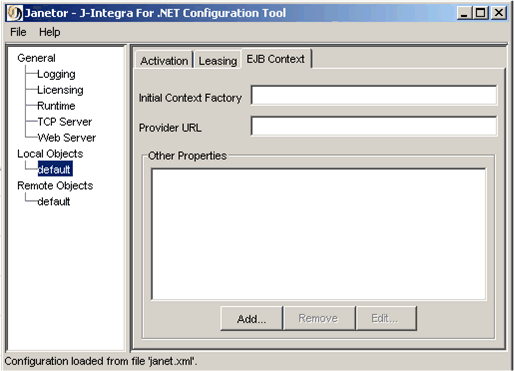
| Field | Description |
| Initial Context Factory |
Maps directly to the INITIAL_CONTEXT_FACTORY property required to initialize the context. |
| Provider URL |
Maps directly onto the PROVIDER_URL property required to initialize the context. |
The Remote Objects category contains settings related to remote objects. "Remote objects" are .NET objects that J-Integra for .NET communicates with using .NET Remoting.
Each node - other than default - contains settings for a particular class of remote objects. The default settings are used for all classes not specified in the list of sub-categories. The Authentication tab also applies for a particular class (or default).
To add a specific .NET class, right-click on Remote Objects and select Add Class.... A dialog pops up and prompts you to add the specific class. Include the full namespace and class name.
Check the Copy settings from default class box if you would like the new class to be initialized with the same settings as those defined for the default remote object class.
To remove a class, right-click on the sub-category and select Remove class. Remember to save your settings to file.
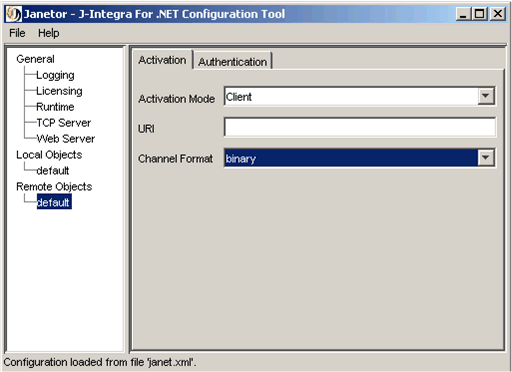
This tab controls how remote objects are activated.
| Field | Description |
| Activation Mode |
The activation mode to use for the remote object. Of course, on the server side the remote object must be exposed as the same mode selected here. There are two to choose from, adhering to the .NET Remoting standard. The most conventional is Client, where J-Integra® for .NET will access the remote object as a CAO. In the Web services option, J-Integra® for .NET will access the remote object as an SAO. |
| URI |
The URI on which the remote object is accessible. |
| Channel format |
The channel format to use. In all scenarios, we recommend using binary. |
The Authentication tab controls how a client authenticates itself to a Web server when trying to access remote objects:
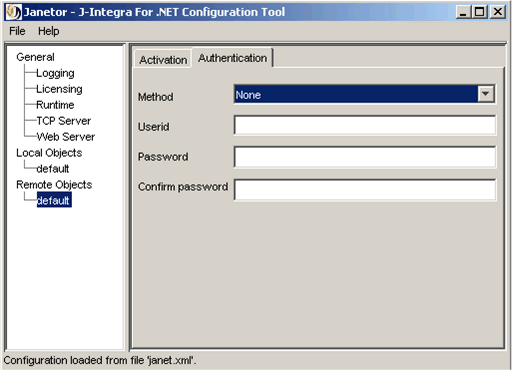
| Field | Description |
| Method |
The method used for authentication. One of:
|
| Userid |
The user name to use for authentication. |
| Password |
The password to use for authentication. |
| Confirm password |
A confirmation of the password entered in the Password field. Authentication parameters can only be saved when the Password and Confirm password fields match. |
This section describes how Janetor can be used to generate a WAR file for easy deployment of J-Integra® for .NET in any J2EE-based Application Server.
The concept of a Web Application is defined by the Java Servlet Specification v2.2 that describes a set of server-side resources that make up an online application. The specification defines how to package these resources into a WAR file so that they can be deployed on an Application Server that supports J2EE Web Applications. A Web Application operates within a servlet context that defines an environment that is separate from other Web Applications running on the same server. Each Web Application is accompanied by a deployment descriptor that ties its resources together and describes how the resources are deployed on an Application Server.
The J-Integra® for .NET runtime includes a class, com.intrinsyc.janet.JanetServlet, that implements a Java servlet to accept and process incoming .NET Remoting messages. A J-Integra® for .NET web application archive packages the J-Integra for .NET runtime and a specified user library with a deployment descriptor referencing the JanetServlet class. Refer to any of the Application Server examples to see how this facility can be used to enable .NET access to EJBs running in an Application Server.
To create a J-Integra® for .NET WAR file, go to File and then Export web application archive...
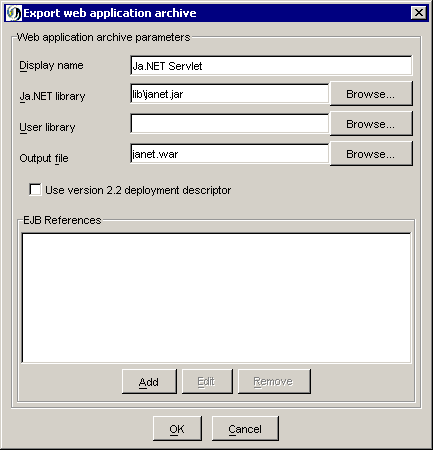
| Field | Description |
| Display name |
The application display name in the deployment descriptor. |
| J-Integra for .NET library |
Full path to the J-Integra® for .NET run-time library janet.jar, which should be in $USER_INSTALL_DIR$\lib. |
| User library |
Full path to a JAR file containing user classes to be added to the WAR file. |
| Output file |
The output file to create. |
| Use version 2.2 deployment descriptor |
When selected, ensures that the generated deployment descriptor is compatible with version 2.2 of the web application archive specification; otherwise, a newer (version 2.3) format is used for the deployment descriptor. |
| EJB References |
Lists the currently configured EJB references. Each EJB reference in the list is translated into a ejb-ref element in the generated deployment descriptor. |
The Add, Edit, Remove buttons add, edit and remove EJB references, respectively.
|
© 2007 Intrinsyc Software International, Inc. All rights reserved. Legal |