Visual Studio .NET Add-in
The J-Integra® for .NET Visual Studio Add-in provides seamless integration
of J-Integra® for .NET functionality with Microsoft Visual Studio
2002 and 2003 Integrated Development Environments. It enables developers
who use Visual Studio to incorporate J-Integra® for .NET into their .NET
client applications while working entirely within the Visual Studio environment.
The J-Integra® for .NET Visual Studio Add-in provides the all the functionality
necessary to create a working client including the following tasks.
- generating .NET proxies of Java classes and
- generating a .NET Remoting configuration file that
requires no editing.
The J-Integra® for .NET Visual Studio Add-in provides Java-side functionality
to complement the .NET-side functionality provided by the Eclipse
Plug-in
Note that you may still want to use the command line versions of the
GenNet application to incorporate
them into an automated build process.
During the beta release of the VS.NET add-in the program is a separate
download. It is not part of the main installer and must be installed manually.
Prerequisites
Steps to Install
Install J-Integra
for .NET 2.1 (or higher) and select "Visual Studio and Eclipse
Plugins" in the feature select screen.
Steps to Uninstall
Launch the uninstaller of J-Integra
for .NET 2.1 and select "Visual Studio and Eclipse Plugins"
Alternatively, launch a command window (cmd.exe)
and execute the following command. This
will completely remove the add-in from your system. Note:
This file can be found in $USER_INSTALL_DIR$\plugins\vs.net\2002-03
JI_vsnet0203 /u
JI_vsnet0203 Command Arguments
The install utility for the J-Integra® for .NET Visual Studio Plug-in
uses the following syntax:
JI_vsnet0203.exe [arguments]
Possible arguments are:
| Argument |
Description |
Example |
/i (default)
|
Install the plug-in to the system. |
/i
|
/u
|
Uninstall the plug-in from the system. |
/u
|
Note: When starting JI_VisualStudio
from the command-line, it will automatically search through the registry
for the J-Integra® for .NET installation directory. It
may prompt you for a JRE directory.
|
|
By default during the installation the add-in is configured to automatically
load when Visual Studio .NET loads up.
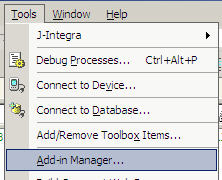
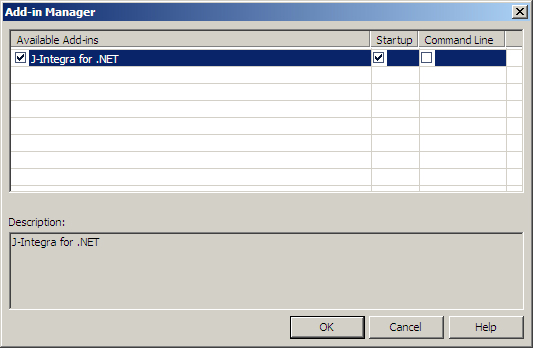
The add-in's starting patterns can be modified through the Add-in Manager
in VS.NET. This
can be accessed through the Tools->Add-in Manager.. menu item. |
|
|
The left most check box represents whether J-Integra® for .NET is currently
loaded or configured to be loaded. As
you can see the add-in is configured to be loaded at startup.
If the J-Integra® for .NET Add-in is not checked, checking it and selecting
OK will cause the Add-in to load.
The Add-in can be configured to load to meet the user demands.
Note: This
Add-in is not command-line safe as it pops up modal dialog boxes that
will cause your automated build to hang. Please
do not select "Command Line".
|
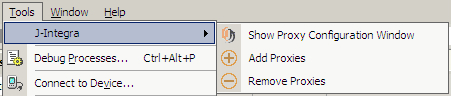
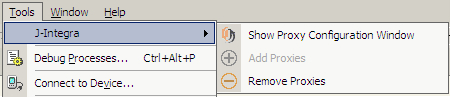
The Add-in state can be quickly determined from the state of the menu
items.
|
|
When all three menu items are available this means the add-in has not
been loaded.
Selecting a menu item will cause the add-in to automatically load and
execute the selected option, if possible. For example, selecting
"Remove Proxies" with a solution that does not have proxies
will not do anything except load the add-in. |
|
|
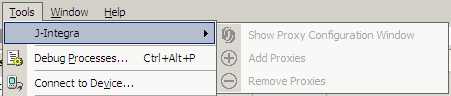
The add-in is loaded but a valid solution that can host the proxies
is not.
Please create/load a solution so that you will be able to add/configure
the proxies for a project. |
|

|
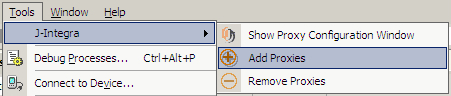
The add-in is loaded and a valid project is loaded, ready to host the
proxies.
Selecting "Add Proxies" will launch the wizard. Please
see Adding proxies to a project for more information |
|
|
The add-in is loaded and a project containing proxies has been found.
Selecting "Show Proxy Configuration Window" will show the
tool window, if it is not already visible.
Selecting "Remove Proxies" will prompt you to confirm that
you wish to remove the proxies from the project. Please
see Removing proxies from a project for more information. |
The proxies are added a project level and the settings are stored in
the project file. This
allows for copying the project to different locations and other computers
while retaining the complete settings.
Note: Because
the settings are stored in the project file, every time you change your
proxy configuration you must save your project file otherwise the changes
are lost!
There are two steps to adding J-Integra® for .NET proxies to your project:
Invoke the wizard by
either a) selecting the "J-Integra->Add Proxies" menu item,
b) or adding a new project item
Complete the wizard
steps.
1 a) Selecting the Add-Proxies menu item.
A solution must be loaded before attempting to add the proxies to a
project. If
a solution is not loaded all three options should be disabled. If
they are not please first ensure your add-in is started.
Navigate to the "Tools" menu and
select "J-Integra->Add Proxies"
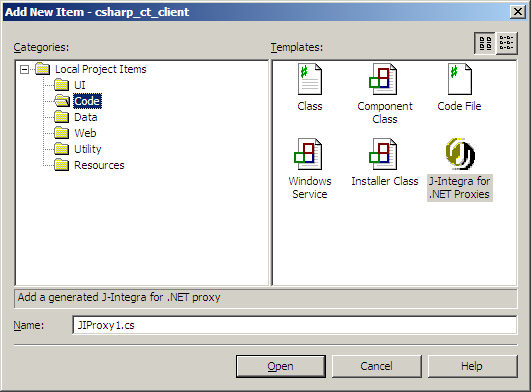
1 b) Adding a new project item
Right click the project you wish to add the proxies to and select "Add
New Item".
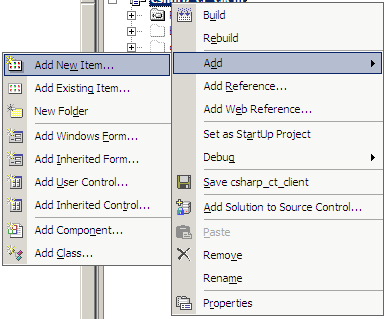
Browse down until you find the "J-Integra® for .NET Proxies"
or...
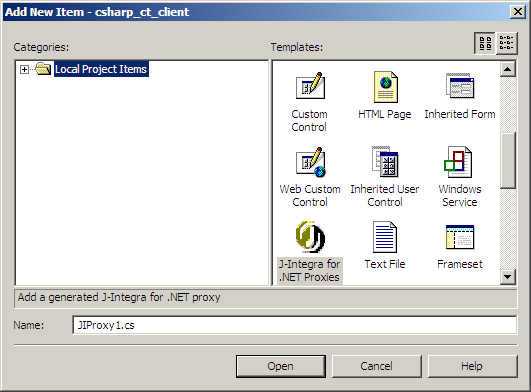
or browse under the "Code" subfolder and select "J-Integra
for .NET Proxies"
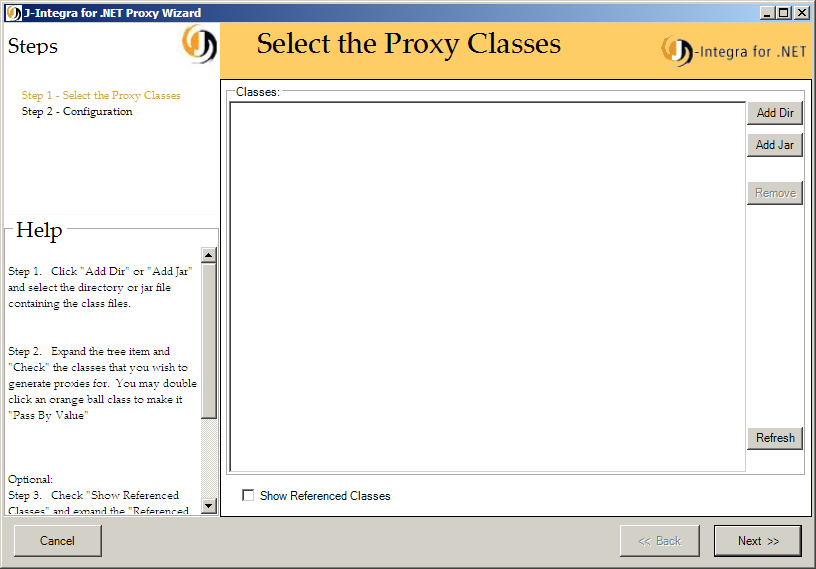
2. Completing the Wizard
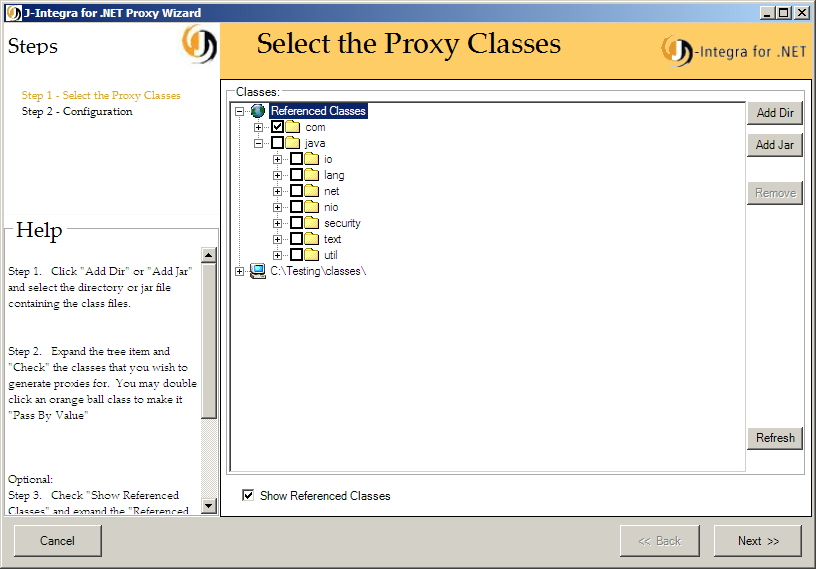
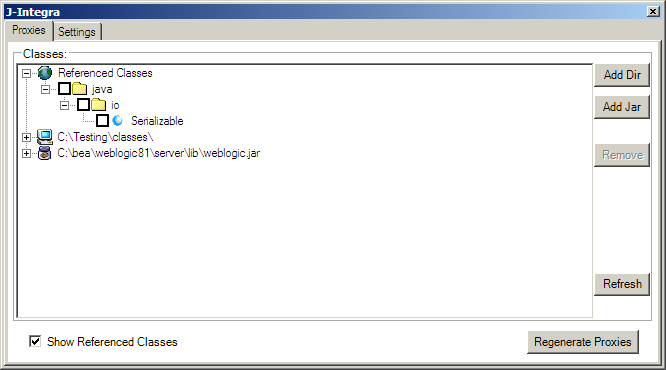
The initial wizard startup screen is shown below.
The first step is to add the directories and JAR files that are required
by your proxy classes. This
can be accomplished by using the buttons on the right side "Add Dir"
and "Add Jar". After
adding a classpath item the contents are automatically analyzed and displayed.
Please select the all the Java classes that you wish to generate proxies
for. This
is very similar to the GenNET
step of browsing for the classes.
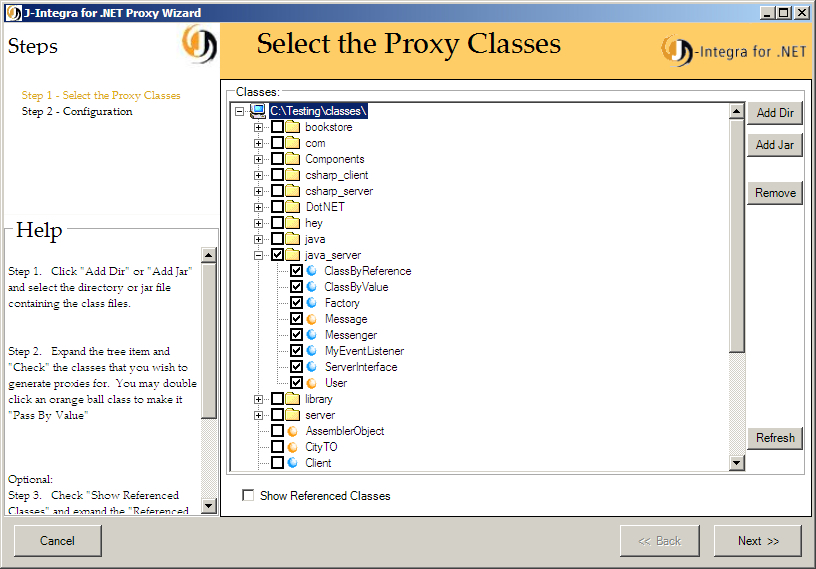
You can specify a class as Pass By Value by double-clicking the name.
This will
only work for classes with an orange ball which is used to indicate that
the class implements the java.io.Serializable interface.
After selecting all the classes you wish to generate proxies for, you
can filter out the external references by checking the check box "Show
Referenced Classes". Please
check all the classes you wish to generate proxies for.
Note: The other trees
will automatically collapse to avoid changing two trees at the same time.
If you get an error message similar to the one below, this means that
you have not included all the necessary classpath items. You
must add the location (directory or jar) where the class in questions
resides.

After clicking "Next" you will be presented with the following
screen. For
a complete description of the available options please see below under
Configuring Options.
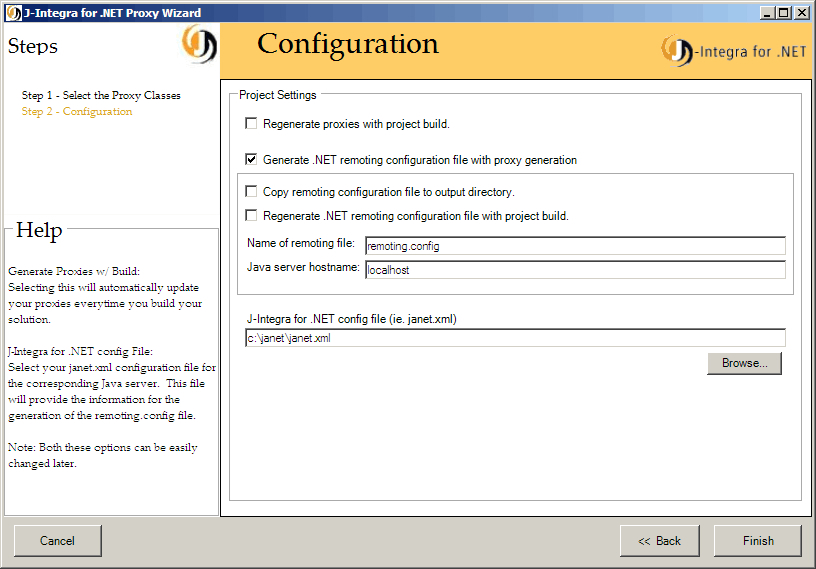
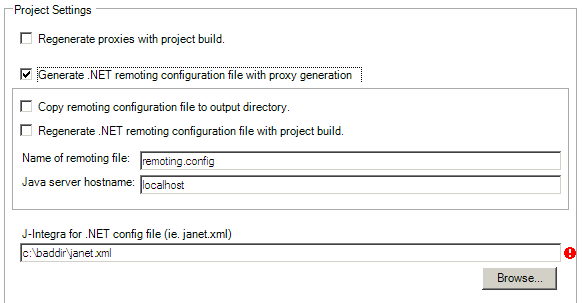
If you do not select a proper J-Integra® for .NET config file (janet.xml)
then you will be presented with an error and can not continue until this
is set.
After adding the proxies to a project a Tool Window is shown. This a
fully functional tool window that can be moved, resized, docked, and hidden.
It is very
similar to the first wizard step. You can add and remove classpath items
(Directories and JAR files), select / de-select proxy classes, etc.
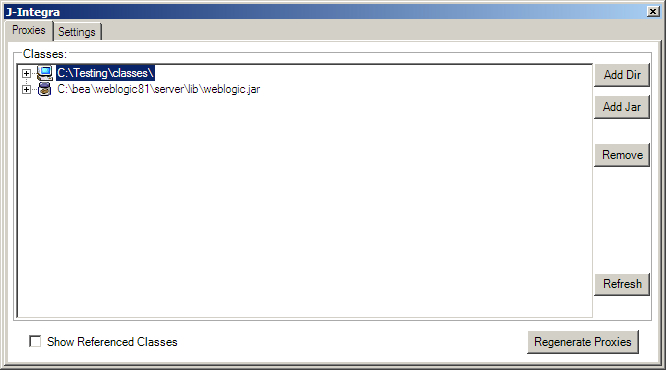
If the tool window is not visible then it can be shown by navigating
to the "Tool -> J-Integra -> Show Proxy Configuration Window".
Note: If you get a message similar
to the one below, this means that you have not included all the necessary
classpath items. You
must add the location (dir or jar) where the class in questions resides.
There are several important features of configuring your proxies that
are made easily visible and available through this Add-in.
Filtering "Referenced Classes"
By checking "Show Referenced Classes" you can filter out the
unnecessary classes. The
other classpath items will be collapsed while working under the "Referenced
Classes" tree. This
eliminates the possibility of making changes to the proxy list that would
affect the Reference list. Please
un-select any classes that you don't wish proxies to be generated for.
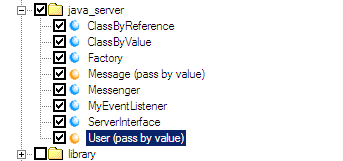
Selecting proxies as "Pass By Value"
The J-Integra® for .NET Visual Studio Add-in allows the proxies to be
easily configured as Pass By Value objects. To set a Java class as a Pass
By Value object the class must implement the java.io.Serializable interface
which is shown as a class with an orange ball beside it.
First select the class
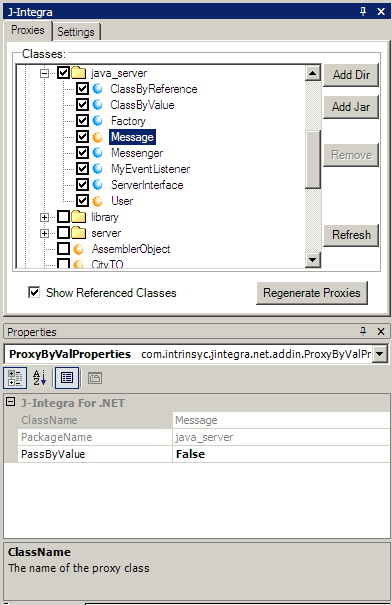
Then change the PassByValue value in the properties window to true.
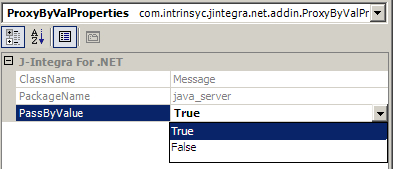
"(pass by value)" is then appended to the class name to help
in identifying Pass By Value objects.
Tip: You can also double
click an orange ball class to change the Pass By Value state.
The two options available for configuration are show in the "Settings"
tab of the tool window.
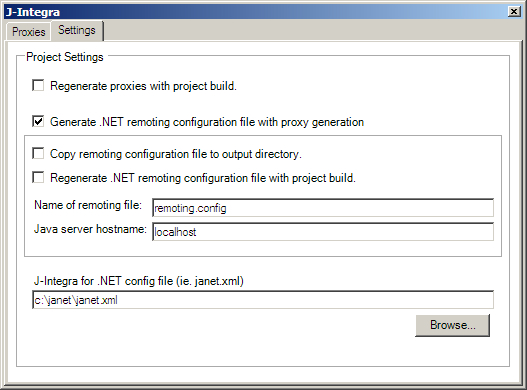
"Regenerate proxies with project
build" allows you to automatically generate updated proxies
with every solution/project build. This
may add unnecessary time to your project build if your proxies are stable.
Instead the proxies may be manually built using the "Regenerate Proxies"
button.
"Generate .NET remoting configuration
file with proxy generation" selects whether or not to
generate a .NET remoting configuration file whenever the proxies are generated.
This option
enables the four options below.
"Copy remoting configuration file
to output directory" will automatically copy the generated
remoting.config file to the current output directory (ie.. bin\Debug or
bin\Release) with every project build. Note:
It will overwrite any existing file with the same name as it in the output
directory.
"Regenerate .NET remoting configuration
file with project build" determines
if the configuration file should be updated with the project build. This
is also accomplished by selecting "Regenerate proxies with project
build" and "Generate .NET remoting configuration file with proxy
generation". If
those two are selected then this checkbox doesn't do anything. However,
this option is useful if you wish only regenerate the configuration file
with the project build.
"Name of remoting file" specifies
the name of the remoting configuration file.
"Java server hostname" specifies
the remote machine name to be used in the configuration file. By
default, this will be filled in from the janet.xml file specified. The
user can overwrite the default and enter their own remote machine name.
Clearing
the entry will switch back to the default hostname as specified by janet.xml.
"J-Integra® for .NET config file (ie.
janet.xml)" points
to the java server configuration file. This ensures that both the .NET
client and the java server are in synch. Any
config option not present in this tool window (such as Collection Mappings
and Java Server location) are configured through the janet.xml file. This
configuration file can be created or edited using either the Janetor
Configuration Tool, or the Eclipse
Plug-in.
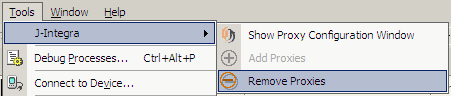
The proxies can be removed from your .NET project in two ways.
The first way is to the menu "Tools"
-> "J-Integra" -> "Remove Proxies"
.
This will then present the following the dialog
confirming your selection.
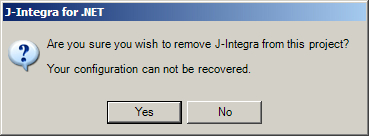
Note: You must save the project for the changes
to be permanent.
The second way to remove the proxies is to
delete the generated proxy file (i.e., janet1.cs).
You will be presented first with a Visual
Studio dialog.
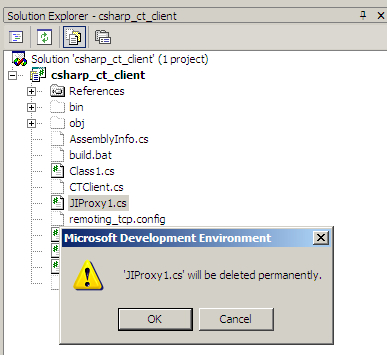
Then a J-Integra dialog will confirm if you really want to remove the
proxies from your project.
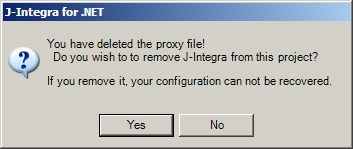
Note: You
must save the project for the changes to be permanent.