Access Java from .NET |
|
This example demonstrates how to access Java from .NET client. J-Integra® for .NET is a Java interoperability component that bridges Java/J2EE and Microsoft .NET. It provides bi-directional access of Java objects and .NET components.
Use this example as a guideline to show you how to access various Java objects exposed as a .NET Singleton, Client Activated Object (CAO) and "marshal-by-value" object using J-Integra for .NET. This example also demonstrates how a .NET client can catch a custom exception thrown by a java server.
The Steps to Follow will show you how to deploy J-Integra® for .NET correctly for this example. Refer to the diagram below for an overview of the scenario:

Finally, we will extend this example to show you how to access the same Java objects using HTTP binary instead of TCP binary. Once you have completed the Steps to Follow, take a look at Access Java from .NET Using J-Integra® for .NET's internal Web server.
A platform with Microsoft Visual Studio .NET 2003 (7.1.3088 or higher) installed, or at least the .NET Framework 1.0.3705 or higher. This will be known throughout the example as the .NET platform.
A platform with J-Integra for .NET 1.5.1295 (or higher) installed. This will be known throughout the example as the Java platform.
A version of JDK (1.3.1 or higher) installed on the Java platform, and the bin directory included in the path. This required to compile and run the Java server.
Verify that GenService is installed correctly on the .NET platform.
Perform this step on the Java platform.
In this step, you will need to configure J-Integra® for .NET as a server so it can respond to incoming TCP requests. This is done through the Janetor tool.
Launch Janetor from the Start Menu.
java -jar $USER_INSTALL_DIR$\lib\janetor.jar
Select File - Open and open janet.xml located in $USER_INSTALL_DIR$\examples\csharp_java.
Install your J-Integra® for .NET product license. See Installing the J-Integra® for .NET license for further information.
Select java_server.Factory under Local Objects. Here you see that J-Integra® for .NET exposes this class as a Singleton at the at the given machine address and port using TCP.
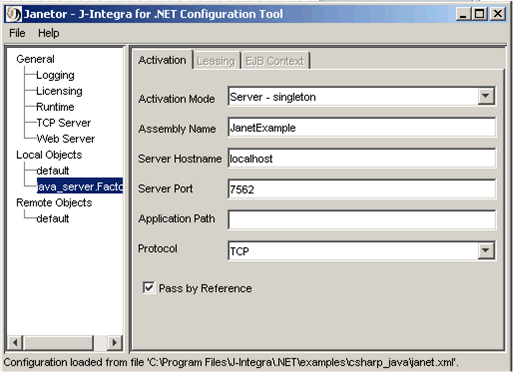
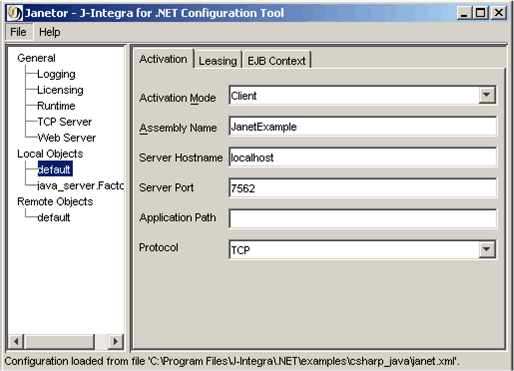
The default node above exposes the remaining classes with the same configuration details, except that they are not Singletons.
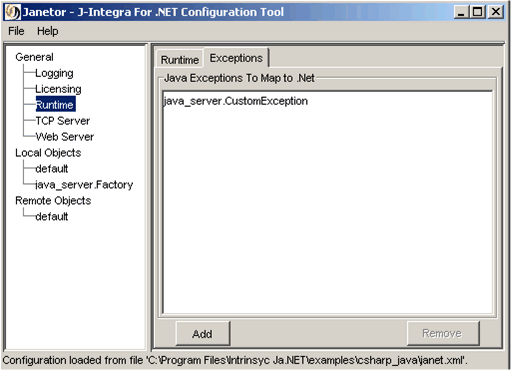
Select the Exceptions tab under General->Runtime. Here you see that the java_server.CustomException class has been added to the list of Java exceptions to map to .NET.
Before you exit Janetor, save the configuration by going to File - Save.
Perform this step on the Java platform.
In this step, you will compile the Java code and run the J-Integra for .NET server.
At the command-line, change directory to $USER_INSTALL_DIR$\examples\csharp_java and enter:
javac -classpath . java_server\*.java
To run the server, in the same directory enter:
java -cp $USER_INSTALL_DIR$\lib\janet.jar;. com.intrinsyc.janet.Main
Perform this step on the Java platform.
In this step, you will use the GenNet tool to generate .NET proxies for the Java classes.
Launch GenNet from the Start Menu.
Change directory to $USER_INSTALL_DIR$ and then enter:
java -jar lib\gennet.jar
The first screen of GenNet shows a list of machines that have GenService running (screenshot not shown). Select the appropriate one and click Next.
The next screen prompts for the components (JAR files or directories)
to be added to the CLASSPATH. Each of these components are required
in order for the Java runtime to resolve references to Java classes when
generating .NET proxies. You'll need to add the following component:
- $USER_INSTALL_DIR$\examples\csharp_java
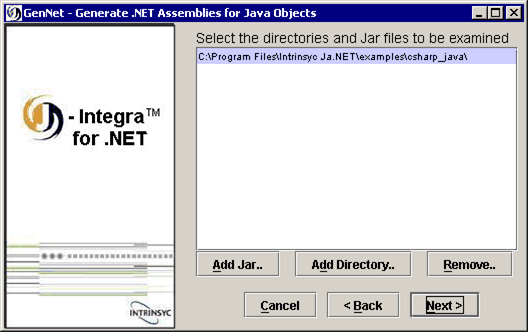
Move on to the next step by clicking Next.
The next screen prompts for the specific Java classes that will
have .NET proxies generated for them. Click on Browse...
to add the following classes (use the CTRL key to select
multiple classes):
- java_server.ClassByValue
- java_server.ClassByReference
- java_server.ServerInterface
- java_server.CustomException
- java_server.Factory
Make java_server.ClassByValue a "marshal-by-value" object by clicking on Options... and checking Pass by value.
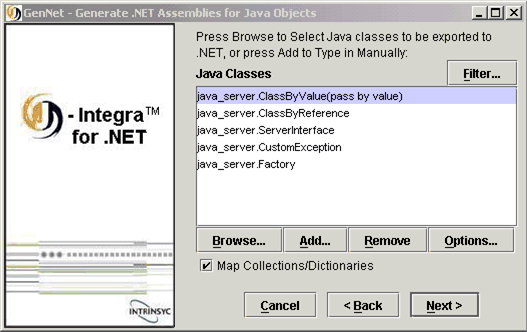
Move on to the next step by clicking Next.
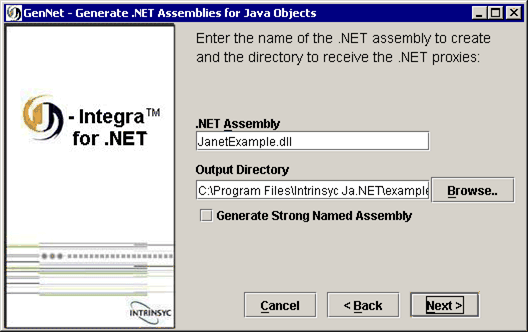
The next screen prompts you to specify the .NET Assembly name along with the output directory. The screen shot may show a different output directory than the value of Output Directory shown below, but it should be pointing to $USER_INSTALL_DIR$\examples\csharp_java\csharp_client\bin\Debug.
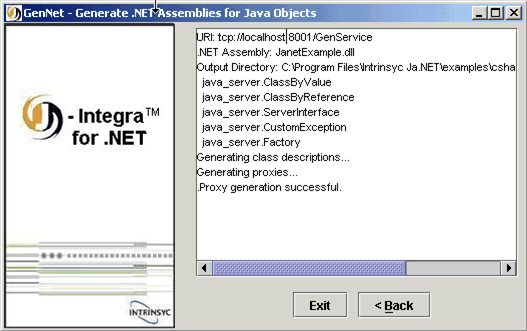
You should see a message that the proxy generation was successful. Click Exit to exit GenNet.
Perform this step on the .NET platform.
In this final step, you will configure the .NET client using a configuration file, then compile and run it.
Along with .NET proxies, GenNet generates .NET configuration files to be used as templates - one for the HTTP channel and one for the TCP channel. As the .NET client will be using .NET Remoting's TCP binary to connect to the Java server, we will modify remoting_tcp.config. You can find this in the same directory that the proxies were generated in.
Modify remoting_tcp.config to look like:
<configuration> <system.runtime.remoting> |
Notice that tcp://localhost:7562 matches what was entered under the java_server.Factory in Janetor. Change accordingly if necessary.
Load csharp_client.sln located in $USER_INSTALL_DIR$\examples\csharp_java\csharp_client and press F5 to run, or simply run the executable in the bin\Debug directory.
A console should come up and you should see the output:
Hello World!  From Singleton
Hello World!  From Marshal-By-Ref 1
Hello World!  From Marshal-By-Val 1
Successfully caught custom exception: java_server sample custom exception
Press any key to continue...
Press Enter to exit.
Examine the .NET source to look at the various tests that the client runs to access the Java objects.
You can use the same technique that was illustrated here for custom exceptions to also catch java language exceptions. For example, if the java server throws a java.lang.IllegalArgumentException, you can explicitly catch this exception in your .NET client by using GenNet to generate a proxy for the java.lang.IllegalArgumentException and using Janetor to add this exception class to the J-Integra® for .NET runtime exception map. Note that if don't generate proxies for specific custom / system exception classes, or don't include them in the J-Integra® for .NET runtime exception map, then by default the .NET client will receive a System.Runtime.Remoting.RemotingException.
The previous example showed how to access Java objects by starting the J-Integra® for .NET server in TCP binary mode. The following addendum will show you how to harness J-Integra® for .NET's internal Web server to access the same Java objects in HTTP binary mode. You must first successfully deploy the example in TCP binary (as instructed above) before proceeding further.
Perform this step on the Java platform.
Launch Janetor again, and open janet_http.xml located in $USER_INSTALL_DIR$\csharp_java.
Install your J-Integra® for .NET product license. See Installing the J-Integra® for .NET license for further information.
Select Web Server under General. Here you see that Use Internal Web Server is checked and the internal Web server configuration details (for a full description see the Janetor documentation).
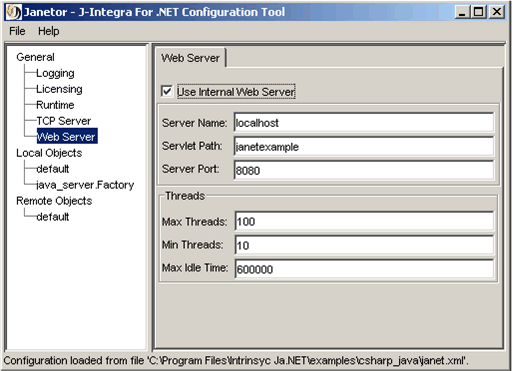
Select default under Local Objects. Here you see that the protocol has been changed from the previous scenario to HTTP and other fields are disabled. This is because the internal Web server is now enabled and the disabled fields must now be changed under Web Server.
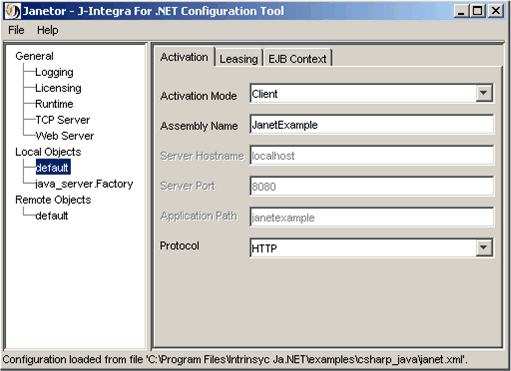
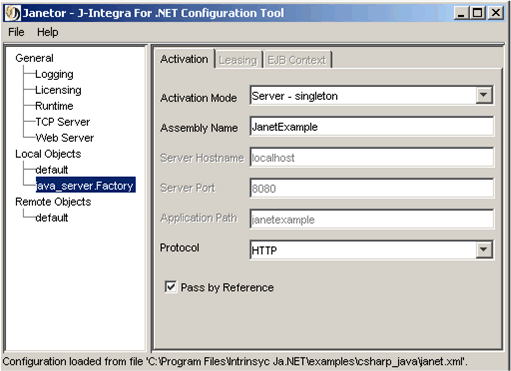
Select java_server.Factory under Local Objects. Here you see that the protocol has been changed from the previous scenario to HTTP and other fields are disabled. This is because the internal Web Server is now enabled and the disabled fields must now be changed under Web Server.
If you select the Exceptions tab under General->Runtime, you will notice that the java_server.CustomException class has been added to the list of Java exceptions to map to .NET, as in the TCP case.
Before you exit Janetor, save the configuration by going to the File menu item and clicking Save.
Perform this step on the Java platform.
At the command-line, change directory to $USER_INSTALL_DIR$\examples\csharp_java and enter:
java -cp $USER_INSTALL_DIR$\lib\janet.jar;$USER_INSTALL_DIR$\lib\org.mortbay.jetty.jar;$USER_INSTALL_DIR$\lib\javax.servlet.jar;. -DJANET_CONFIG_FILE=janet_http.xml com.intrinsyc.janet.Main
The extra components in the CLASSPATH are the libraries required to start the internal Web Server.
Perform this step on the .NET platform.
In $USER_INSTALL_DIR$\examples\csharp_java\csharp_client\bin\Debug, modify remoting_http.config to look like:
<configuration> |
Notice that http://localhost:8080/janetexample matches what was entered under java_server.Factory in Janetor. Change accordingly if necessary.
Load csharp_client.sln located in $USER_INSTALL_DIR$\examples\csharp_java\csharp_client and change the first line of code from:
RemotingConfiguration.Configure("remoting_tcp.config");
to:
RemotingConfiguration.Configure("remoting_http.config");
Press F5 to run, or simply run the executable in the bin\Debug directory.
You should expect to see the exact same output as described in the previous scenario, except now the example is using an HTTP channel provided by the internal Web Server.
|
© 2007 Intrinsyc Software International, Inc. All rights reserved. Legal |