Visual Basic Accessing Java via Early Binding

Visual Basic Accessing Java via Early Binding |
|
From VB there are two ways of accessing COM objects: early binding, and late binding access. Late binding access means that there is no information available at compile time about the object being accessed -- everything is evaluated dynamically at runtime. Early binding access provides you with information about the object you are accessing while you are building your program. It is also faster when running your program to use early binding access.
For more information about comparing early binding and late binding, please refer to Microsoft article Using Early Binding and Late Binding in Automation.
It may be the case that you have existing Java classes which you would like to access from Visual Basic. This example demonstrates how you can render existing classes accessible for early binding access from Visual Basic. The classes which you will render accessible are some of the standard Java AWT classes.
From Visual Basic you will create an AWT frame and put a button in the frame. AWT buttons generate events, to which other Java objects can subscribe using java.awt.Button.addActionListener. It would be pretty ugly if your VB code had to explicitly use the Java mechanism for handling events. Fortunately it doesn't. J-Integra® renders Java events accessible from VB using the standard COM event mechanism (dim withevents).
The AWT frame is owned by the Java Virtual Machine which is executing in another process, possibly even on another machine. It is important to understand that J-Integra® does not provide a mechanism to mix Java user interface components (Java Beans) with VB components (forms). You do however have access to all public methods and fields of any public java class from your Visual Basic programs.
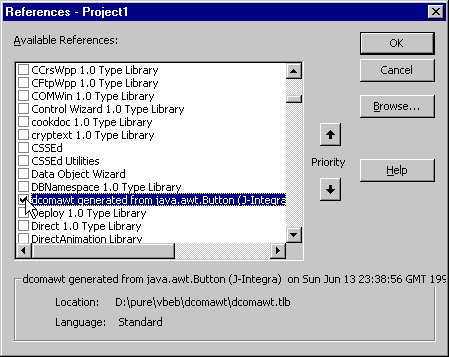
The J-Integra® kit must be installed on both the Windows VB client, and on the machine running the Java class being accessed (more precisely, the J-Integra® 'bin' directory is required on the Windows client, and the J-Integra® runtime (jintegra.jar) is required on the machine running the Java class).
Compile the generated Java wrappers, compile the generated IDL, and register the type library
This example assumes that you have installed
the JDK under D:\JDK1.3.1
We will be performing this example under D:\pure\vbeb. Create that directory, and a dcomawt directory underneath it. Set your path environment variable to include the JDK and J-Integra® bin directories, and update your CLASSPATH environment to include:

Start the J-Integra® 'java2com' tool:

Fill in the dialog box that is displayed as follows:
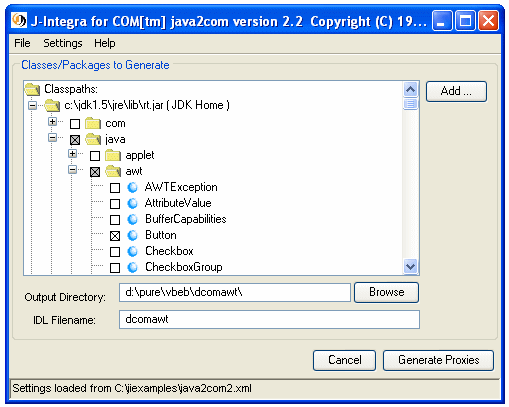
The Java class to be analyzed is java.awt.Button. The 'java2com' tool looks at this class, and at all other classes that this class uses in method parameters. See the java2com tool documentation for more information.
The IDL file name is dcomawt. This is name of the IDL file which will be generated.
All Java classes that are public, not abstract, and have a no-parameter constructor are rendered accessible as COM Classes. Other public classes, and all public interfaces are rendered accessible as COM interfaces.
The 'java2com' tool generates Java class contain DCOM marshalling code used to
access Java objects. These generated classes are used behind the scenes by the
J-Integra® runtime. You simply need to compile them, and make sure that they are
in your CLASSPATH (which they are, because you added the
dcomawt
subdirectory to your CLASSPATH above):

The deprecation warnings occur because some of the AWT methods are deprecated, however J-Integra® renders them accessible from COM nevertheless.
If you do not have Microsoft's MIDL compiler ('midl.exe') already installed, you can download and install it as part of the Core SDK of Platform SDK (C:\Program Files\Microsoft SDK\Bin\MIDL.EXE). MIDL is also included in Microsoft Visual Studio 6.0 (C:\Program Files\Microsoft Visual Studio\VC98\Bin\MIDL.EXE).
Change directory to the
dcomawt
subdirectory, compile the generated IDL file using the 'midl' tool:
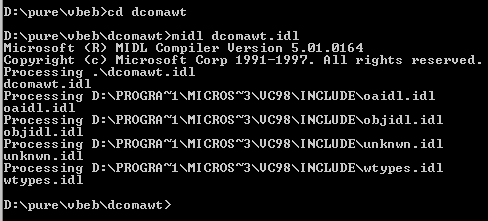
Note: if you get "MIDL2021 : duplicate id" error when compile dcomawt.idl, please check out this KB article for solution: http://j-integra.intrinsyc.com/support/kb/article.aspx?id=183231
Then use the J-Integra® 'regtlb' tool to register the generated type library and the JVM, which will be created in the next step using regjvm. This type library and JVM are then used by Visual Basic to provide access to the objects described therein:

You have just compiled dcomawt.idl to produce the dcomawt.tlb type library, which has the same prefix as the name of JVM, dcomawt. You then registered the type library, telling J-Integra® that the COM classes in that type library could be found in the JVM with the ID dcomawt.
Having done this, change directory back up to the vbeb parent directory.
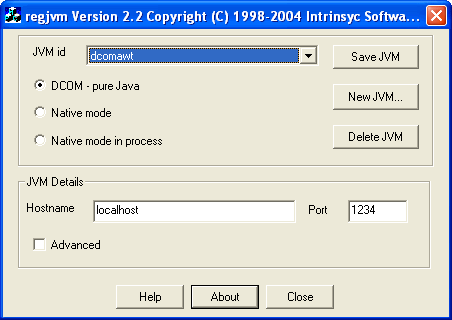
There are three modes that you can use to register the JVM: DCOM mode, native mode out-of-process, and native mode in-process. This example shows the DCOM mode. Check out the regjvm tool for more information.
Note: The JVM name must be the same as the name of the .tlb file, which is "dcomawt".
Use regjvm tool to tell J-Integra® that the JVM with the ID
dcomawt can be found on the
local host, listening on TCP/IP port 1234:
This is the Main Java class. As you can see, it does nothing apart from register the JVM:
public class Main {
  public static void main(String[] args) throws Exception {
    com.linar.jintegra.Log.logImmediately(3, "jintegra.log");

    // Tell the J-Integra® Activator on the localhost that this JVM is alive, ready to receive
    // remote requests, and it is called "dcomawt".
    com.linar.jintegra.Jvm.register("dcomawt");
    Thread.sleep(6000000); // Sleep for an hour
  }
}
|
Cut and paste the above class from your Web Browser into the
Main.java
file, build it using the
javac Main.java
command, and then run it, setting the JINTEGRA_DCOM_PORT property to 1234:

Start up Visual Basic, create a new Standard EXE project.
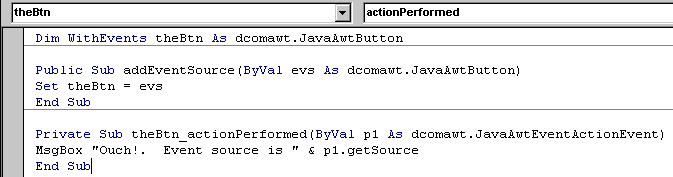
Click on Project|Add Class Module. You are going to create a class which will register for events generated by the Java AWT button, and display a message when the button is clicked. This is the complete code for Class1:
|
|
Double-click on the form to edit the form_load code. When the form loads, the button is added to the frame (both of which are created as globals), and then it tells the event handler class about the button. This is the complete code for Form1:
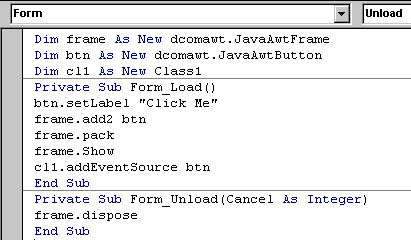
Note that the AWT Frame's
add
method is wildly overloaded. Since COM does not support overloaded methods,
each of the overloaded forms is presented with a number to distinguish it. You
can specify a specific name to be used for each method using the "Names..."
dialog box in 'java2com'.
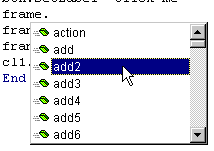
You will see that
add2
is the one we want:

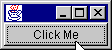
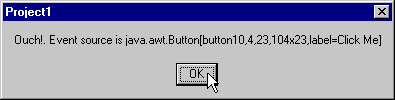
When you run the project, the Java Window should be activated (it may be minimized). When you click on the Java button, the VB event handler should display a message:
If you would like to see this same example, but with a C++ client instead, please see this KB article.
In order to run the JVM on a UNIX machine, copy the J-Integra® runtime (jintegra.jar), Main.class and the generated wrappers IID*.class to the UNIX machine. Start the JVM in exactly the same way as above ( java -DJINTEGRA_DCOM_PORT=1234 Main).
On the VB Windows client, unregister the JVM, and then re-register it, setting
the binding to the corresponding UNIX host's TCP/IP name:

You should then be able to run the VB client, but this time it will be talking to the UNIX box. Note that the AWT frame will of course be displayed on the UNIX machine's display.