Accessing MTS Hosted COM Objects from Java Using JBuilder 3

Accessing MTS Hosted COM Objects from Java Using JBuilder 3 |

|
This example demonstrates how to access MTS hosted COM objects from Java using JBuilder 3. J-Integra® for COM is a Java interoperability component that bridges Java and MTS hosted COM objects. It provides bi-directional access of Java objects and COM components.
In this article I am going to show you exactly what is involved in using JBuilder 3 to develop a pure Java application which accesses COM objects hosted in Microsoft Transaction Server (MTS). Both the JBuilder development environment and the resulting application will run under Windows NT, Solaris and Linux, with no native code required.
I am going to introduce you to the basics of COM, by way of a small Tic-Tac-Toe example that Microsoft
ships with MTS. There is a standard Visual Basic client which can be used to invoke
the COM components that implement the game's logic. You will see how easy it is to use
JBuilder to create an equivalent pure Java client which will run on any platform
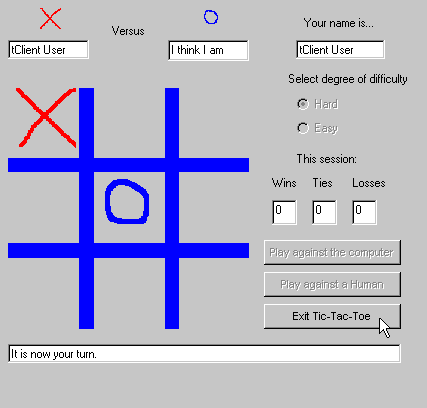
that supports a standard JVM:

Please don't be misled. Although this example is based on the Tic-Tac-Toe game COM component that ships with MTS, you can use the techniques illustrated below to help your enterprise leverage new and existing COM components, re-using them from pure Java, saving your organization significant amounts of both time and money.
In order to help JBuilder integrate COM objects into a pure Java application this example makes use of a pure Java-COM bridging tool called J-Integra® from Intrinsyc Software, Inc.
The nice thing about using JBuilder 3 with J-Integra® to access COM objects is that you are not really aware that the objects you are accessing are actually anything other than normal Java objects. They are presented to you as standard Java objects.
This article will be of interest to anyone that needs to access COM components from pure Java applications created with JBuilder.
You can not create an instance of an interface, because interfaces by definition contain no implementation -- you can only create instances of classes (which you can then access via interfaces).
The fundamental ideas behind COM are exactly the same. There is the concept of COM interfaces, which say what something looks like (but nothing about how it is implemented) and there is the concept of COM classes, which contain implementation code.
COM interfaces and classes are defined in a special Interface Definition Language (IDL).
[
  odl,  uuid(CAAD7F9A-F22D-11D0-B5CB-00C04FB957D8), helpstring("IComputer Interface"),
  dual, oleautomation
]
interface IComputer : IDispatch {
  [id(0x60020000)]
  HRESULT AddNewGame([in] VARIANT_BOOL bEasy, [out] VARIANT* pvGameID, [out] VARIANT* pvOrder,
                     [out] VARIANT* pvX,      [out] VARIANT* pvY);
  [id(0x60020001)]
  HRESULT NewMove([in] long lGameID,    [in] VARIANT_BOOL bEasy, [in] long lX, [in] long lY,
                  [out] VARIANT* pvMyX, [out] VARIANT* pvMyY,    [out] VARIANT* pvWin);
};
This interface comes from the Tic-Tac-Toe example which ships with MTS. It defines methods to start a new game and
to make a new move in an existing game.
I have marked out in bold the name of the interface and the methods in the interface. You can probably work out the meaning of the various parameters ... the only non-obvious element is the VARIANT type -- a parameter of this type can be pretty much anything -- a string, a number, a reference to another object, whatever.
[
  uuid(CAAD7F9B-F22D-11D0-B5CB-00C04FB957D8),
  helpstring("Computer Class")
]
coclass Computer {
    [default] interface IComputer;
};
I have marked in bold the name of the class, and the interface it implements. COM clients can create instances
of the Computer COM class, which they can then access via the IComputer COM interface. In theory other COM
classes could implemented the IComputer COM interface, and clients could access those classes using the same
calling code.
\Program Files\Mts\Samples\Packages\tServer.dll.
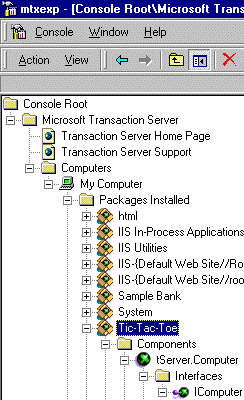
You can configure COM components in MTS using the Microsoft Transaction Server explorer, started using
Start|Programs|Microsoft NT 4.0 Option Pack|Microsoft Transaction Server|Transacton Server Explorer. This
is what the explorer looks like:
This example takes another route by using a pure Java-COM bridging product called J-Integra® from my company (Intrinsyc Software, Inc.). J-Integra® lets you access COM objects from all Java implementations. Also, because it requires no native code your Java software can run on any platform that supports a standard JVM. JBuilder 3 and J-Integra® work seamlessly together to provide easy access to COM objects.
In order to access the above COM class and interface from Java, you run a J-Integra® tool called 'com2java' which reads the type information from the type library, and outputs pure Java classes and interfaces which can be used to access the corresponding COM classes and interfaces.
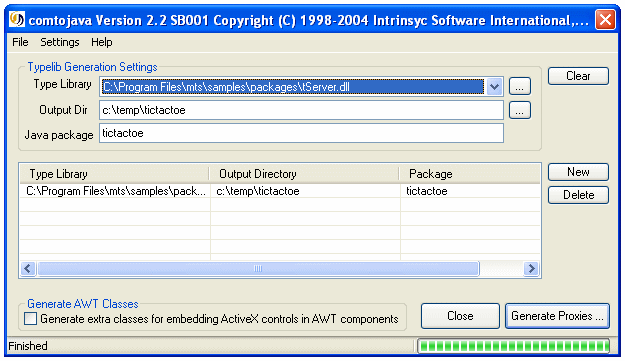
It is important to understand that the generated files can be used on any operating system that supports a standard JVM. Although you need a Windows machine to generate them (because the 'com2java' tool only runs under Windows), you only need to generate them once -- you do not need the 'com2java' tool at run-time, it is a development tool.
Some of the parameters are passed by reference and are modifiable, as signified by the [out] attribute. Since Java parameters are always passed by value, J-Integra® maps COM parameters that are passed by reference to single element arrays.
Also, some of the parameters are VARIANTS (which can contain any type). J-Integra® maps these to the Java java.lang.Object class, the actual parameter value being a java.lang.Integer, java.lang.Float, java.util.Date, java.lang.String, etc.
This is the AddNewGame method in the IComputer COM interface:
  HRESULT AddNewGame([in] VARIANT_BOOL bEasy, [out] VARIANT* pvGameID, [out] VARIANT* pvOrder,
                     [out] VARIANT* pvX,      [out] VARIANT* pvY);
... and this is the corresponding method generated in the IComputer Java interface:
  public void addNewGame  (
              boolean bEasy,
              Object[] pvGameID,
              Object[] pvOrder,
              Object[] pvX,
              Object[] pvY) throws java.io.IOException, com.linar.jintegra.AutomationException;
In a moment you will see how this method is used.
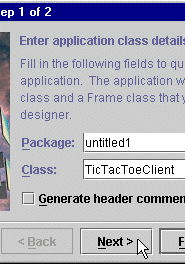
Next add a new application to your project using File|New...|Application, specify 'TicTacToeClient' as the
application class name, and click on the Next button:
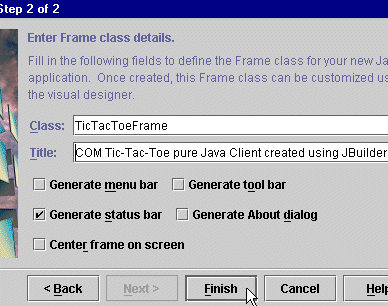
Enter 'TicTacToeFrame' as the Frame class name and
'COM Tic-Tac-Toe pure Java Client created using JBuilder' as the Title. Finally check the Generate status bar checkbox, and
click on Finish:
Select the Swing Containers tab, click on the first button in the toolbar (JPanel), and click on the main window to create a new frame. Set the new panel's name property to 'gridPanel'.
Select the Swing tab, click on the first button in the toolbar (JButton), and click on the strip representing the panel to create a button in the panel. Do this a total of three times to create three buttons.
Change the constraints of the panel to West, and set its layout property to GridLayout.
A new gridLayout1 item will have appeared in
the hierarchy of objects, double-click on it to display its properties:
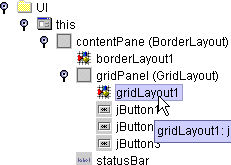
Set its columns and rows properties to '3'.
Double-click on the gridPanel and add six more buttons to the panel. Rename each of the buttons based on
its XY position in the grid, the first row being 'btn00', 'btn01', 'btn02', etc. You should now have two top level
components, the gridPanel (West) and the status bar added by default (South):
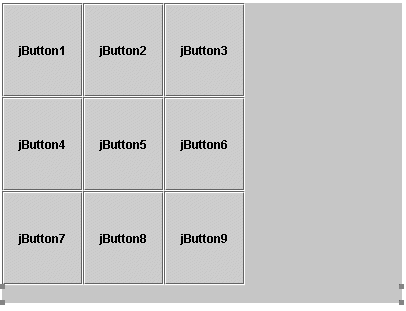
Set the gridPanel constraint to 'Center'.
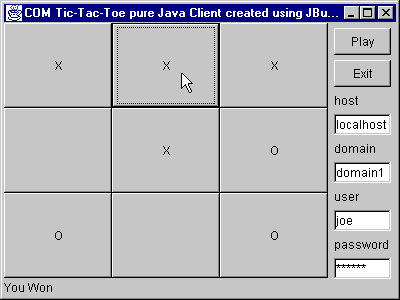
Your GUI should now look something like this:
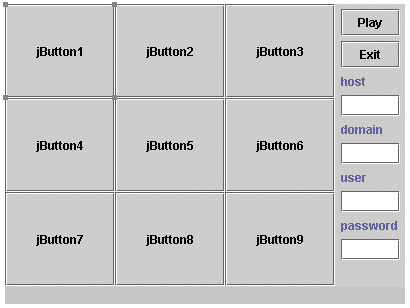
If you are running JBuilder under Solaris or Linux, copy the J-Integra® runtime (jintegra.jar) from the J-Integra® kit, and the tictactoe package to the Solaris/Linux machine from the Windows NT machine, and import them into JBuilder as described next (obviously the paths will be different).
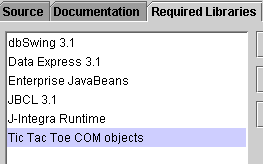
Use the Project|Properties menu item, and select the Required Libaries tab in the Paths tab.
Click on Add... and then New..., set the Name to 'J-Integra® runtime', and click on Add... and browse to the J-Integra® runtime (jintegra.jar) in the J-Integra® kit directory (probably /jintegra/lib/jintegra.jar). Click on OK to add it to the project.
Now do the same thing again, but this time set the Name to 'Tic-Tac-Toe COM objects' and select the directory
containing the 'tictactoe' directory containing the Java proxies generated by 'com2java':
You will need to establish the authentication information used to access the COM object by calling com.linar.jintegra.AuthInfo.setDefault(...). Note that J-Integra® can use native code to pick up your current identity automatically, but since we want a client which will run on any operating system, we are explicitly setting the NT domain/user/password to be used.
Next create an instance of the Computer COM object, passing the name of the machine it is running on as a parameter.
We will invoke the addNewGame method to start a new game. As described above, some of the parameters are passed by reference (a single element array). In addition because the parameters are COM Variants they are mapped to the java.lang.Object type.
Having started the new game, we must update the symbols representing the human and the computer, and update the board if the computer has moved:
  tictactoe.Computer computer;
  int gameID;
  String us = "";
  String them = "";
  void jButton10_actionPerformed(ActionEvent e) {
    statusBar.setText("");
    com.linar.jintegra.AuthInfo.setDefault(domain.getText(), user.getText(), password.getText());
    try {
      if(computer == null) {
        computer = new tictactoe.Computer(host.getText());
      }
      Object gameIDPar[] = { null };
      Object order[] = { null };
      Object foeX[] = { null };
      Object foeY[] = { null };
      computer.addNewGame(false, gameIDPar, order, foeX, foeY);
      gameID = ((Integer)gameIDPar[0]).intValue();
      if(((Integer)order[0]).intValue() == 1) {
        us = "X";
        them = "O";
      } else {
        us = "O";
        them = "X";
        move(((Integer)foeX[0]).intValue(), ((Integer)foeY[0]).intValue(), them);
      }
    } catch(java.io.IOException ioe) {
      computer = null;
      statusBar.setText(ioe + "");
    }
  void move(int x, int y, String symbol) {
    if(x == 0 && y == 0) btn00.setText(symbol);
    if(x == 0 && y == 1) btn01.setText(symbol);
    if(x == 0 && y == 2) btn02.setText(symbol);
    if(x == 1 && y == 0) btn10.setText(symbol);
    if(x == 1 && y == 1) btn11.setText(symbol);
    if(x == 1 && y == 2) btn12.setText(symbol);
    if(x == 2 && y == 0) btn20.setText(symbol);
    if(x == 2 && y == 1) btn21.setText(symbol);
    if(x == 2 && y == 2) btn22.setText(symbol);
  }
  void btn00_actionPerformed(ActionEvent e) {
    myMove(0, 0);
  }

  void btn01_actionPerformed(ActionEvent e) {
    myMove(0, 1);
  }
  void myMove(int x, int y) {
    if(gameID == 0) {
      return;
    }
    move(x, y, us);
    Object foeX[] = { null };
    Object foeY[] = { null };
    Object win[] = { null };
    try {
      computer.newMove(gameID, true, x, y, foeX, foeY, win);
      switch(((Integer)win[0]).intValue()) { // constants defined by server
        case 1:
          statusBar.setText("You Won");
          break;
        case -1:
          move(((Integer)foeX[0]).intValue(), ((Integer)foeY[0]).intValue(), them);
          statusBar.setText("You Lost");
          break;
        case 2:
          move(((Integer)foeX[0]).intValue(), ((Integer)foeY[0]).intValue(), them);
          statusBar.setText("A tie");
          break;
        case -2:
          statusBar.setText("A tie");
          break;
        default:
          move(((Integer)foeX[0]).intValue(), ((Integer)foeY[0]).intValue(), them);
          return;
      }
      gameID = 0;
    } catch(java.io.IOException ioe) {
      statusBar.setText(ioe + "");
      computer = null;
    }
  }
  void jButtonxx_actionPerformed(ActionEvent e) {
    com.linar.jintegra.Cleaner.releaseAll();
    System.exit(0);
  }
do the same thing in the event handler which gets called when you close the window:
  protected void processWindowEvent(WindowEvent e) {
    super.processWindowEvent(e);
    if (e.getID() == WindowEvent.WINDOW_CLOSING) {
      com.linar.jintegra.Cleaner.releaseAll();
      System.exit(0);
    }
  }
    btn00.setText("");
    btn01.setText("");
    btn02.setText("");
    btn10.setText("");
    btn11.setText("");
    btn12.setText("");
    btn20.setText("");
    btn21.setText("");
    btn22.setText("");
}
First of all, you need to configure DCOM for remote access.
Start the Microsoft Transaction Server explorer (Start|Programs|Microsoft NT 4.0 Option Pack|Microsoft Transaction Server|Transacton Server Explorer). Right-click on the Microsoft Transaction Server|Computers|My Computer| Packages Installed|Tic-Tac-Toe branch, and select Properties. Go to the Security pane, and set the Authentication Level for Calls to Connect (J-Integra® does not support packet level authentication).

Just to remind you, this is the big picture once again:

Such a compromise is no longer an issue. You have seen that by using JBuilder 3 (with J-Integra®) you can access new and existing COM components from Java without writing a single line of native code, and without having to install a single piece of runtime software on the Windows machine hosting the COM component. What is more, you have seen that your Java client can run on any platform that supports a standard JVM. This coupling of pure Java-COM bridging with minimal deployment overhead makes for a compelling solution.
The potential savings are enormous -- practically every large organization's IT department is split into two camps, one focused on Java, the other on Microsoft's COM and MTS, each camp duplicating each others efforts, wasting massive amounts of time on redundant design, code, tests and maintenance.
Now as a Java developer using Borland JBuilder 3 you can re-use the COM/MTS software components developed by your colleagues, and you can do so without compromising those very principles that made you choose Java and JBuilder 3 in the first place.